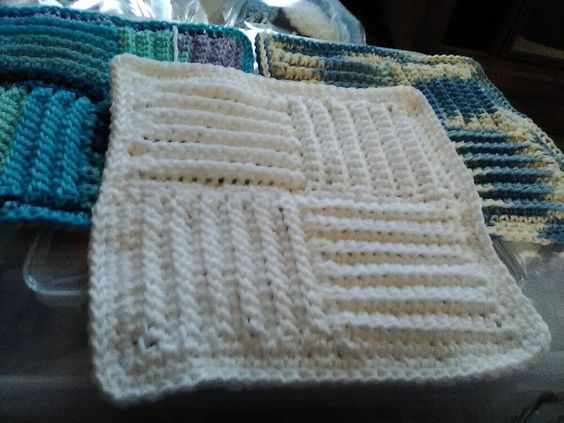
Crochet Ridged Four Squares Dishcloth
Discover the art of creating a unique and textured dishcloth with the Crochet Ridged Four Squares pattern. This delightful project combines the beauty of crochet with the practicality of a dishcloth, resulting in a functional and visually appealing addition to your kitchen. Immerse yourself in the world of crochet as you embark on the journey of making the Crochet Ridged Four Squares Dishcloth. With its intricate design and charming ridges, this dishcloth is not only a practical item but also a work of art. The pattern guides you through the process of creating four squares that are then joined together to form a stunning dishcloth that will impress anyone who lays eyes on it. Whether you're a seasoned crocheter or just starting out, this project is sure to captivate your creativity and leave you with a beautiful and functional piece for your home.

Materials:
1 Skein worsted weight cotton yarn (like peaches and cream) Solid 2.5 oz (120yds), multicolor 2.0 oz (102yds) (did not use whole skeins)
Size G hook (6-4.25mm)
yarn needle
scissors
Finish size: The Solid Color was 8 1/2" x 8 1/2" inches, The multicolor ones was 7 3/4" x 7 3/4" inches.
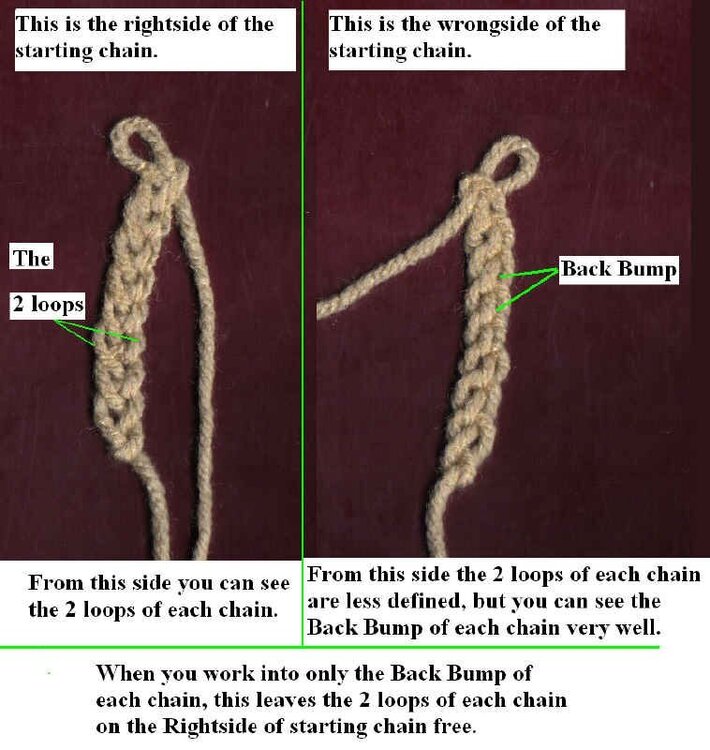
Back Bump of Chain Diagram:

Directions:
Patch one:
Row 1: Ch14, 1 sc in back bump of 2nd chain from hook, 1 sc in back bump of each of the next 12 chains, ch1 and turn. (13sc)
Row 2: 1 sc in backloop of each of the 13 sts, ch1 and turn. (13sc)
Rows 3-12: 1 sc in backloop of each of the 13 sts, ch1 and turn. (13sc)
Row 13: 1 sc in backloop of each of the 13 sts, ch1, but do not turn. (13sc)
Patch two:
Row 14: 1 sc in row end of Row 13, 1sc in each of the next 11 row ends (work into side of stitched on odd rnds and thru both loops on even rows), work a sc decrease in last row end and chain loops from starting chain, ch1 and turn. (13 sts)
Row 15: 1 sc in backloop of each of the 13 sts, ch1 and turn. (13sc)
Rnd 16-25: 1 sc in backloop of each of the 13 sts, ch1 and turn. (13sc)
Row 26: 1 sc in backloop of each of the 13 sts, ch1, but do not turn. (13sc)
Patch three:
Row 27: 1 sc in row end of Row 26, 1 sc in each of the next 12 row ends, ch1 and turn. (13sc)
Rows 28-38: 1 sc in backloop of each of the 13 sts, ch1 and turn. (13sc)
Row 39: 1 sc in backloop of each of the 13 sts, ch1, but do not turn. (13sc)
Patch 4:
Row 40: 1 sc in row end of Row 39, 1 sc in each of the next 11 row ends, insert hook hook in next row end yarn over, pull up a loop, insert hook in first chain loop(s) from first patch, yarn over, pull up a loop, yarn over and pull thru all three loops on hook, slst in next chain loop(s) on first patch and turn.
Row 41: 1 sc in back loop of each of the 13 sts on patch 4, ch1 and turn. (13sc)
Row 42: 1 sc in back loop of each of the first 12 sts, insert hook in last st, yarn over, pull up a loop, insert hook in next free chain loop(s) on patch one, yarnover, pull up a loop, yarn over and pull thru all 3 loops on hook, slst in next free chain loop(s) on patch one and turn.
Row 43: 1 sc in back loop of each of the 13 sts, ch1 and turn. (13sc)
Row 44-51: Repeat Rows 42 and 43 eight times for rows 44 thru 51, ending with a repeat of Row 43.
Row 52: 1 sc in back loop of each of the 13 sts, slst in last free chain loop(s) of patch one.
Border:
Rnd 1: Ch1, sc decrease first 2 row ends together, 1 sc in each of the next 11 row ends, 3 sc in next st, [1 sc in each of the next 24 sts/row ends, 3 sc in next st] Do this 3 times 1 sc in each of the next 12 sts, join with sts to first st.
Rnd 2: Ch1, 1 sc in same st as joining, 1 sc in each of the next 12 sts, 3 sc in next st, [1sc in each of the next26 sts, 3 sc in next st] do this 3 times, 1 sc in each of the next 13 sts, join with slst to first sc.
Rnd 3: Slst in each sc around till you reach joining slst from Rnd2, slst in joining slst, leaving a tail; cut yarn, pull yarn out thru slipstitch, string tail into yarn needle, with yarn needle insert into first slst made on Rnd 3 under both loops (front loop and back loop), pull needle and tail thru, then insert needle into last slst made of Rnd 3 in center of the stitch between the front loop and back loop and through the stitches behind the slst. (the same spot the tail is coming out of at first) Do not pull to tight. Secure end and weave in ends.