Crochet Rudolph the Red-Nosed Reindeer
Crocheting a Rudolph the Red-Nosed Reindeer can be such a joyful and festive project! From his iconic red nose to his fluffy antlers, bringing this beloved character to life with yarn is a delightful way to add a touch of holiday spirit to your home decor or gift-giving. As you work on each stitch, imagining Rudolph ready to guide Santa's sleigh on Christmas Eve, it's impossible not to feel a sense of warmth and nostalgia. Plus, the satisfaction of creating something so cute and charming with your own hands is truly rewarding - you'll be spreading joy and cheer wherever your crocheted Rudolph goes!
Abbreviations used:
sc – single crochet
dec 2 tog – decrease two together (sometimes called sc2tog)
F/O – fasten off
dec 3 tog – decrease three together (sometimes called sc3tog)
Supplies needed:Yarn in the following colors: orangish-brown, dark brown, red, off-white, black, and white
Fiberfill
Yarn needle
Scissors
G hook (4.0 mm)
Head – make 1, starting w/ orangish-brown
1. 6 sc in ring (6)
2. 2 sc in ea around (12)
3. 2 sc in ea around (24)
4. *1 sc, 2 sc* around (36)
5. 1 sc in ea around (36)
6. *1 sc in 2, 2 sc* around (48)
7. 1 sc in ea around (48)
8. 1 sc in ea around (48)
Repeat row 8 (9 times)
18. *1 sc in 2, dec 2 tog* around (36)
19. 1 sc in ea around (36)
20. 1 sc in ea around (36)
21. 1 sc in 18, *1 sc in 1, dec 2 tog* 6 times (30)
22. 1 sc in ea around (30)
23. 1 sc in 15, *1 sc, dec 2 tog* 5 times (25)
24. 1 sc in ea around (25)
25. *1 sc in 3, dec 2 tog* around (20)
26. 1 sc in ea around (20)
27. 1 sc in ea around (20)
28. 1 sc in ea around (20)
29. *1 sc in 2, dec 2 tog* around (15)
30. *1 sc, dec 2 tog* around (10)
31. *dec 2 tog* around (5)
weave end thru 5, pull tight & F/O
weave in ends
Nose – make 1 in red
1. 6 sc in ring (6)
2. *1 sc, 2 sc* 3 times (9)
3. 1 sc in ea around (9)
Antlers – make 2 in dark brown
1. 6 sc in ring (6)
2. *1 sc, 2 sc* around (9)
3. 1 sc around (9)
Repeat round 3 (1 time) F/O
Body – make 1 in orangish-brown
1. 6 sc in ring (6)
2. 2 sc in ea around (12)
3. 2 sc in ea around (24)
4. *1 sc, 2 sc* around (36)
5. 1 sc in ea around (36)
6. *1 sc in 2, 2 sc* around (48)
7. 1 sc in ea around (48)
Repeat round 7 (29 times)
37. *1 sc in 2, dec 2 tog* around (36)
38. *1 sc, dec 2 tog* around (24)
39. *dec 2 tog* around (12)
40. *dec 2 tog* around (6)
weave end thru 6. pull tight. F/O
Belly – make 1 in off-white
**Note: with amigurumi, I prefer not to chain when I turn. This creates a straighter edge, which makes for neat assembly
1. Ch. 7, turn, sc in ea (6), turn
2. 2 sc, sc in 4, 2 sc, turn (8)
3. 2 sc, sc in 6, 2 sc, turn (10)
4. 2 sc, sc in 8, 2 sc, turn (12)
5. sc in ea across, turn (12)
Repeat round 5 until piece is long enough to go under body
– dec 2 tog, sc in 8, dec 2 tog (10)
– dec 2 tog, sc in 6, dec 2 tog (8)
– dec 2 tog, sc in 4, dec 2 tog (6)
– *dec 2 tog* three times (3)
– dec 3 tog F/O
Neck – make 1 in orangish-brown
1. Ch. 30, sl st to join (30)
2. sc in ea around (30)
Repeat round 2 (8 times) F/O
Ears – make 4 in orangish-brown
1. Ch. 9, turn, sc in ea, turn (8)
2. sc in ea across, turn (8)
3. 2 sc, sc in 6, 2 sc, turn (10)
4. dec 2 tog, sc in 6, dec 2 tog, turn (8)
5. sc in ea across, turn (8)
6. dec 2 tog, sc, dec 2 tog, sc, dec 2 tog, turn (5)
7. sc in ea, turn (5)
8. dec 2 tog, sc, dec 2 tog, turn (3)
9. dec 3 tog, F/O
**Note for assembly: Each ear is made up of two ear piece stitched together
Inside of Ear – make 2 in off-white
1. Ch. 6, turn sc in ea, turn (5)
2. sc in ea, turn (5)
3. dec 2 tog, sc in 1, dec 2 tog (3)
4. dec 3 tog, F/O
Tail – make 2 in off-white
1. Ch. 9, turn, sc in ea, turn (8)
2. sc in ea, turn (8)
3. 2 sc, sc in 6, 2 sc, turn (10)
4. dec 2 tog, sc in 6, dec 2 tog, turn (8)
5. sc in ea across, turn (8)
6. dec 2 tog, sc, dec 2 tog, sc, dec 2 tog, turn (5)
7. sc in ea across, turn (5)
8. dec 2 tog, sc, dec 2 tog, turn (3)
9. dec 3 tog, F/o
Top of Tail – make 1 in orangish-brown
1. Ch. 6, turn, sc in ea, turn (5)
2. sc in ea, turn (5)
3. sc in ea, turn (5)
4. sc in ea, turn (5)
5. dec 2 tog, sc in 1, dec 2 tog (3)
6. dec 3 tog, F/O
Legs – starting w/ black
1. 6 sc in ring (6)
2. 2 sc in ea (12)
3. 2 sc in ea (24)
4. BLO – sc around (24)
5. sc in ea around (24), switching to off-white
6. sc in ea around (24)
Repeat round 6 (24), switching to orangish-brown
8. sc in ea around (24)
Repeat round 8 – 2 times (24)
11. *sc in 4, dec 2 tog* 4 times (20)
12. sc in ea around (20)
Repeat round 12 – 20 times
33. *sc in 2, dec 2 tog* around (15)
34. 1 sc around
35. *sc in 1, dec 2 tog* around (10)
36. *dec 2 tog* around (5)
Weave end thru 5 and pull tight, F/O
Neck Fluff – make 1 in off-white
1. Ch. 8, turn and sc in 7 down (7), turn
2. sc in ea (7), turn
3. 2 sc, sc in 5, 2 sc (9), turn
4. sc across (9), turn
5. dec 2 tog, sc in 5, dec 2 tog (7), turn
6. dec 2 tog, sc in 3, dec 2 tog (5), turn
F/O
Muzzle – make 1 in off-white
1. ch. 15, turn, sc in ea across, turn (14)
2. dec 2 tog, sc in 10, dec 2 tog, turn (12)
3. sc in ea, turn (12)
4. dec 2 tog, sc in 8, dec 2 tog, turn (10)
5. sc in ea, turn (10)
6. sc in ea, turn (10
turn to work up side: hdc, dc, hdc, then sc across top

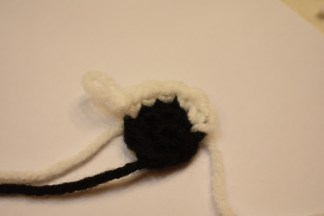
Eyes – make 2, beginning with black and switching to white at round 3
1. with black, 6 sc in ring (6)
2. continuing to work in the round, 1 sc, 2 sc, 2 sc, 1 sc, dec 2 tog (5) F/O, leaving long tail for sewing
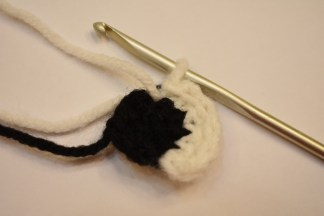
3. join white with sl st at rounded end of pupil (as shown in pic above), with white, sc in same stitch as sl st join. sc in the next 4, sl st in last, turn, DO NOT CHAIN
4. skip sl st, hdc in next 5, sl st into round two to round out the white of the eye, F/O leaving long tail for sewing.
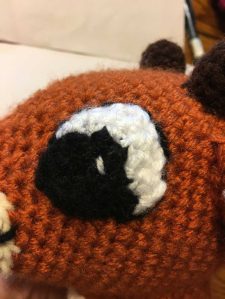
As you stitch the eye into place on your reindeer, the edges of the eyes will smooth out, making more of an eye shape. Use the tail of the black to sew on the black of the eye. Use the tail of the white to sew on the white of the eye. Using a small piece of white, you can stitch on catch lights if you want to.
Note: For a 3-D look, I outline the eyes with black yarn.
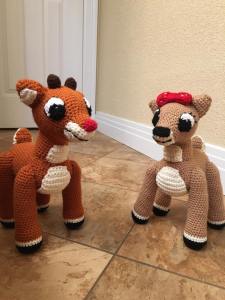
Assembly: using the pictures as a guide. Add stuffing to pieces as you go along.