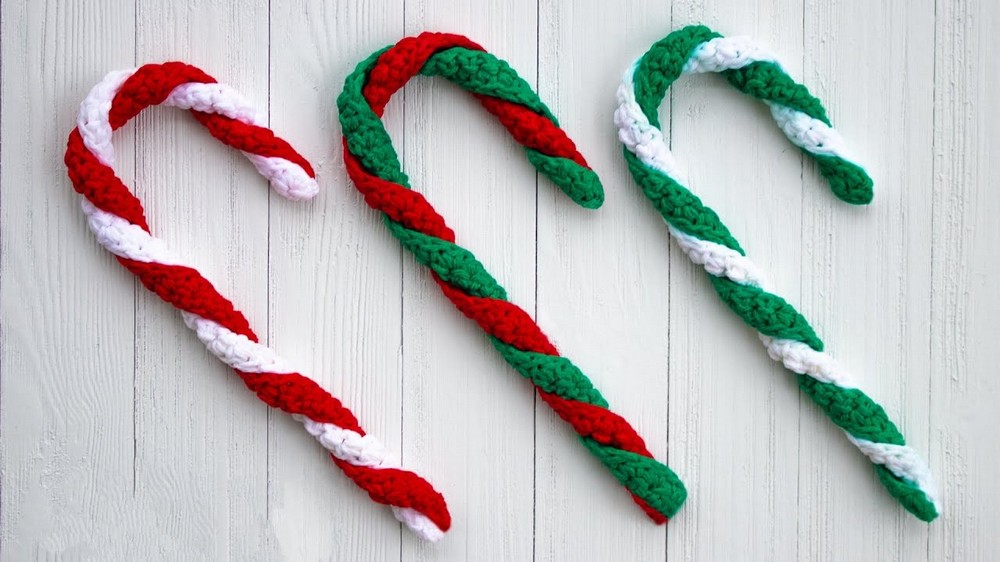
Crochet Christmas Candy Cane
Crochet Christmas Candy Canes are a delightful addition to any holiday décor! These cute and festive decorations can be handmade with love and personalized to match your unique style. Whether you hang them on your tree, use them as gift toppers, or simply add them to your seasonal display, they are sure to bring a touch of charm and nostalgia to your home during the holiday season. Crocheting candy canes is a fun and creative way to add a homemade touch to your Christmas celebrations. So grab your yarn and hook, get cozy with a warm drink, and enjoy crafting these sweet treats to spread joy and cheer all around!

Materials:
- Less than 10 yards of 100% cotton yarn
- Size G crochet hook (4 mm)
- Scissors
- Measuring tape
- Glue that dries clear
- Water
- Flat board
- Plastic wrap or a large plastic bag to cover the board
Abbreviations Used:
- ch: Chain - Yarn over the hook and pull through the loop on the hook to create a chain stitch.
- sc: Single Crochet - Insert the hook into the stitch, yarn over and pull up a loop (two loops on the hook), yarn over again and draw through both loops on the hook.
- sk: Skip - Skip the specified number of stitches (not used in this pattern but included for reference).
And for the general process of finishing your work:
- Fasten off: Cut the yarn, leaving a tail for weaving in, and pull the yarn tail through the final loop on the hook to secure your work.
Remember to use these abbreviations while following crochet patterns, as they are very common and appear in virtually all patterns.
Step-by-step Instructions
- Starting the Candy Cane:
- Begin with a 6-inch tail end of yarn, and make a slip knot.
- Chain 47.
- Row 1:
- Skip the first chain from the hook.
- Make a single crochet in the next chain.
- Continue with one single crochet in each chain across the entire foundation chain.
- You should have 46 single crochet stitches at the end of this row.
- Measure your work, which should be between 13 and 14 inches long to eventually form an 8-inch tall candy cane.
- Row 2:
- Chain one and turn your work.
- Make one single crochet in each stitch across this second row.
- When you reach the end of the row, make your last single crochet stitch, fasten off the work, and leave about a 6-inch tail end.
- Making the Second Color Strip:
- Create another crochet strip identical to the first one, but in a different colour typically red or green, whichever was not your first colour.
- Twisting the Strips:
- Practice twisting the two strips together with the single crochet bumpy ridge side facing outward on both strips.
- Twist them together slowly to encourage the natural curl of the single crochet rows, which will make the candy cane look rounder.
- Glue Mixture Preparation:
- Cover a flat board with plastic wrap or a large plastic bag to prevent sticking.
- Mix ¾ cup of glue that dries clear with about ¼ cup of water. Add more water if the glue is thick.
- Saturating the Crochet Strips:
- Fully saturate the red-colored crochet strip in the glue mixture, ensuring that the cotton absorbs the glue completely.
- Repeat the same process for the white strip.
- Forming the Candy Cane:
- Take the strips out without wringing out too much glue.
- Twist the strips together and then shape them into the form of a candy cane on the plastic-covered board.
- Drizzle more of the glue and water mixture if needed to ensure that the strips are thoroughly soaked.
- Drying the Candy Cane:
- Let the candy cane dry, which may take one to two days, depending on conditions. The glue will dry faster in a warmer room or if placed near a heat source.
- Finishing:
- Once the candy cane is completely dry, it's ready for use as a decoration.