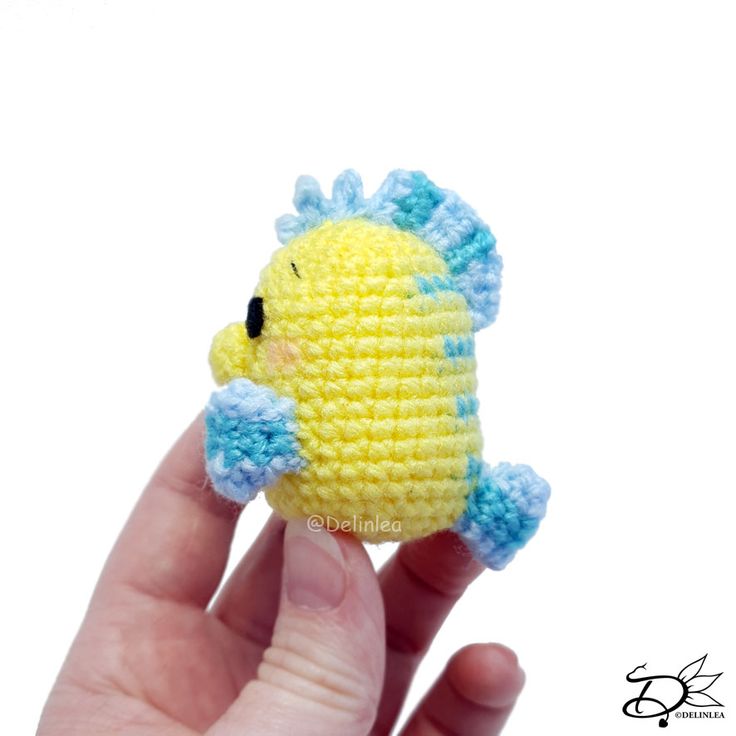
Crochet Flounder Ufufy Amigurumi
If you're into crafting or looking for a unique gift idea, why not try making a Crochet Flounder Ufufy Amigurumi? These delightful fish-shaped plushies are not only adorable but also fun to create. With a few basic crochet stitches and some yarn, you can bring this lovable character to life. Whether you're an experienced crocheter or a beginner, this project is a great way to hone your skills and add a touch of charm to your collection. So grab your crochet hook, pick out some colorful yarn, and get ready to crochet your very own Flounder Ufufy Amigurumi that is sure to put a smile on anyone's face!

For this Pattern you’ll need:
♥ Yarn in the colors Yellow, Light Blue and Darker Blue. (I used Zeeman SuperSoft).
♥ Crochet Hook. (I used a 2mm hook).
♥ Stitch Markers.
♥ Sewing Pins
♥ Stuffing.
♥ Yarn Needle.
♥ Felt in the color Black.
♥ Scissors.
♥ (Fabric) Glue.
Stitches used (US Terms):
Magic Ring.
CH = Chain.
SLST = Slip Stitch.
SC = Single Crochet.
ST = Stitch.
Inc = Increase.
Dec = Decrease.
(…) = Repeat the space in brackets the given number of times.
[…] = Total number of stitches.
Pattern Flounder
This pattern is made using continuous rounds, unless stated otherwise.
Body
Start with the color Yellow.
1: 6SC in a Magic Ring. [6]
2: 2SC in each st around. [12]
3: (1SC, inc) 6 times. [18]
4: (2SC, inc) 6 times. [24]
5: 24SC. [24]
6: 24SC. [24]
From here on you will change colors to create the stripes on his back.
7: Yellow; (3SC, inc) 2 times, Blue; (3SC, inc) 2 times, Yellow; (3SC, inc) 2 times. [30]
8: Yellow; 30SC. [30]
9: Yellow; 30SC. [30]
10: Yellow; 11SC, Blue; 8SC, Yellow; 11SC. [30]
11: Yellow; 30SC. [30]
12: Yellow; 30SC. [30]
13: Yellow; 12SC, Blue; 6SC, Yellow, 12SC. [30]
14: Yellow; 30SC. [30]
15: Yellow; 30SC. [30]
16: Yellow; 13SC, Blue; 4SC, Yellow; 13SC. [30]
Continue with Yellow only.
17: 30SC. [30]
18: (3SC, dec) 6 times. [24]
19: (2SC, dec) 6 times. [18]
Stuff the body.
20: (1SC, dec) 6 times. [12]
21: Dec around. [6]
Fasten off and weave in tail.
Snout
Use the color Yellow.
1: 6SC in a Magic Ring. [6]
2: (3SC in the next st, 2SC) 2 times. [10]
3: 10SC. [10]
Fasten off and leave a long tail for sewing.
Fins/Arms and Tail (Make 3)
Start with the color Light Blue
1: Ch5, insert in the second ch from hook, inc, change to the color Dark Blue; 2SC, change back to Light Blue; 3SC in the next st, continue along the other side of the chain, change to the color Dark Blue; 2SC, change back to the color Light Blue; 1SC. [10]
2: (Light Blue; 2SC, Dark Blue, 2SC, Light Blue; 1SC) 2 times. [10]
3: (Light Blue; Dec, Dark Blue, 2SC, Light Blue; 1SC) 2 times. [8]
Fasten off and leave a long tail for sewing.
Fin/Hair
Start with the color Light Blue.
This part is not made with continues rounds.
1: Ch2, insert in second ch from hook, 1 sc, turn. [1]
2: Ch1, inc, turn. [2]
3: Ch1, 2SC, turn. [2]
Change to the color Dark Blue.
4: Ch1, 2SC, turn. [2]
Change to the color Light Blue.
5-6: Ch1, 2SC, turn. [2]
Change to the color Dark Blue.
7: Ch1, 2SC, turn. [2]
Change to the color Light Blue.
8: Ch1, 2SC, turn. [2]
9-10: Ch3, insert in second ch from hook, 2SlSt. [2]
11: Ch2, insert in second ch from hook, 1SlSt. [1]
Fasten off and leave a long tail for sewing.
Assembling
Whenever I start assembling a Amigurumi, I use sewing pins first to put everything together. This way I can move all parts around easily until I am happy with how it looks. Then I will sew it on. I recommend you do so as well.
I started with sewing on Flounder his head fin/hair, the third ‘hair’ with be on top of his head. Make sure to keep checking that the stripes of his body go on the back. Next sew on his snout, mine came around row 8 and down, from the body. Next sew on his arm fins and the tail. Last cut 2 eyes (and eyebrows) from the black felt and glue those on. With a bit of sewing thread I made the eyebrows, since I thought that was easier as the felt, but you can totally do felt as well!
Flounder is already finished