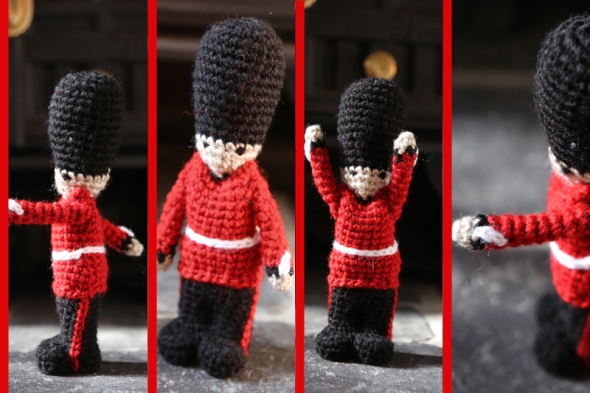
Crochet Adorable Soldier
Crocheting an adorable soldier can be such a rewarding and heartwarming project! Whether you're making it for a loved one or simply indulging in your creativity, the process is filled with joy and satisfaction. From carefully choosing the yarn colors to perfecting each stitch, every step brings you closer to creating a unique and charming keepsake. The end result will surely bring a smile to your face and warmth to your heart as you admire the cute little soldier you've crafted with love and dedication. Happy crocheting!

Materials:
- Double Knit wool in black, skin tone, red and white.
- 3mm hook, or any hook to create a finished work that will hold the filling well
- Yarn needle
- Fibre fill
- Yarn Needle
Abbreviations (UK crochet terms)
- rnd : round
- dc : Double crochet
- st : stitch
- c : chain
- dec : decrease
Head
Circle 6 in black
rnd 1 dc 2 in each st (12)
rnd 2 *dc 2 in 1 st, dc 1* 6 times (18)
rnd 3 *dc 2 in 1 st, dc 2* 6 times (24)
rnd 4-9 dc 24
rnd 10 *dec 1, dc 10* 2 times (22)
rnd 11 *dec 1, dc 9* 2 times (20)
rnd 12 *dec 1, dc 8* 2 times (18)
rnd 13 change to skin tone, dc 18
rnd 14 dc18
rnd 15 *dec 1, dc 1* 2 times (12)
stuff
rnd 16 *dec 1* 2 times (6)
rnd 17 change to black, dc 6
sl st, break thread and pull through last st to finish.
Arms (make 2)
Circle 6 in skin tone
rnd 1 dc 6
rnd 2 change to black, dc 6
rnd 3 change to red, dc 6
rnd 4-12 dc 6
break thread and pull through last st, using a yarn needle, sew up 6 st and pull to close. No need to stuff.
For the white decoration, surface crochet 3 ch from the black band up three rnds, then weave in ends using yarn needle. See photos for reference.
Body (worked bottom up)
In red, ch 24
rnd 1-2, dc 24
rnd 3 *dec 1, dc 10* 2 times (22)
rnd 4 *dec 1, dc 9* 2 times (20)
rnd 5-6 dc 20 (this is the waist)
rnd 7 *dc 2 in 1 st, dc 9* 2 times (22)
rnd 8 *dc 2 in 1 st, dc 10* 2 times (24)
rnd 9-13 dc 24
break thread leaving a long tail and pull through last st. Close the top of the jacket, with the waist shaping placed at the sides, and using the long tail, over sew the 12 stitches. Weave in ends.
For the white decoration, surface crochet using a ch st between rnds 5 and 6, crossing over rnd 5 underneath and arm so you can join the white line in a relatively unobtrusive place. See photos for reference.
Trousers (worked bottom up)
For the base of the trousers, ch 6 in black, dc3 in 1st ch, dc 3 along one side of the chain, dc 3 in the last ch, dc 3 along the other side (12)
*dc 2 in next 3 st, dc 1 in next 3* 2 times (18)
turn work so the wrong side is facing you, then surface crochet using a dc rather than a ch st in a clockwise direction round the edge (18). This turns the corner and you are now working up the legs.
rnd 1-12 dc 18
break thread and pull through last st.
stuff
sew up from front to back in the centre of trousers, from rnd 1-7 and pull tight to define the two legs.
For the red decoration, surface crochet up both sides of the trousers using ch st, then weave in ends using yarn needle.
See photos for refernce.
Shoes (make 2)
These make the front toe section of the shoes which are sewn onto from of the trousers.
For the base, circle 4 in black, but only pull tight enough to for a ½ circle.
dc 2 in each st (8)
turn work so the wrong side is facing you, then ch 1 and surface crochet using a dc rather than a ch st in a clockwise direction round the edge (8). This turns the corner and you are now working up the side of the shoe. ch 1 and turn.
½ rnd 1-2 dc 8, ch1 and turn
stuff
½ rnd 3 *dec 1* 4 times
break thread and pull through last st, using a yarn needle, sew up 4 st and pull to close.
Sew onto the front, bottom of the trousers.
Sew trousers inside the jacket section with a 1 st overlap.
Squeeze the jacket shoulders and hold the head and two arms in place (see photo for reference). Using red thread, sew through the top of the left arm, left shoulder, neck, right shoulder, top of right arm, and back again several times. This allows the arms and head to have movement. Ensure you have sewn this very securely, or even forgo the movement in preference of a more secure toy if giving to a young child.
There you have it