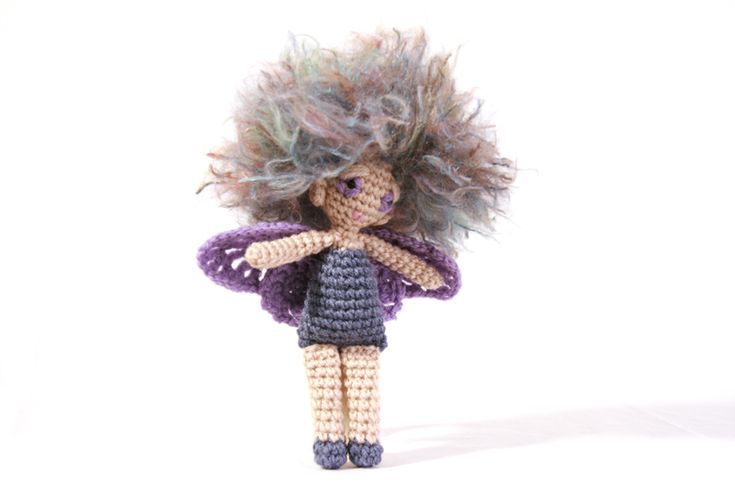
Crochet Fairy Doll
The Crochet Fairy Doll is simply magical! With its delicate wings and charming details, this enchanting little creation brings a sprinkle of whimsy to any space. Whether placed on a shelf as a delightful decoration or gifted to a special someone who believes in the magic of fairies, this crochet creation is sure to bring a smile to anyone's face. Handcrafted with love and care, it's a sweet and unique piece that adds a touch of warmth and whimsy to your surroundings. So go ahead and let this Crochet Fairy Doll work its charm and brighten up your day!

Materials:
- Double Knit wool, skin tone and accent colour
- Double knit fancy wool (for hair) in accent colour
- 2 small black beads for pupils (use embroidered pupils in black thread if for small child)
- tiny amount of lip colour
- 3mm hook, or any hook to create a finished work that will hold the filling well
- Yarn needle
- Fibre fill
Abbreviations (UK crochet terms)
- rnd : round
- dc : Double crochet
- tr : treble
- dtr : double treble
- st : stitch
- c : chain
- dec : decrease
Head and body
Using skin tone, magic circle 6
rnd 1 *dc 2 in 1 st* 6 times (12)
rnd 2 *dc 2 in 1 st, dc 1* 6 times (18)
rnd 3 *dc 2 in 2 st, dc 2* 6 times (24)
rnd 4 *dc 2 in 1 st, dc 3* 6 times (30)
rnd 5-8 dc 30
rnd 9 *dec 1, dc 3* 6 times (24)
rnd 10 *dec 1, dc 2* 6 times (18)
rnd 11 *dec 1, dc 1* 6 times (12)
stuff head before the hole gets too small
rnd 12 *dec 1* 6 times (6)
rnd 12 dc 6
rnd 13 *dc 2 in 1 st, dc 2* twice (8)
change to accent colour
rnd 14 *dc 2 in 1 st, dc 3* twice (10)
rnd 15 *dc 2 in 1 st, dc 4* twice (12)
rnd 16 *dc 2 in 1 st, dc 5* twice (14)
rnd 17 *dc 2 in 1 st, dc 6* twice (16)
rnd 18 *dc 2 in 1 st, dc 7* twice (18)
rnd 19 *dc 2 in 1 st, dc 8* twice (20)
rnd 20 *dc 2 in 1 st, dc 9* twice (22)
rnd 21 *dc 2 in 1 st, dc 10* twice (24)
rnd 22-23 dc 24
stuff body
now ch 1, turn work and fold bottom of body flat with the ch you’ve just created at the right hand edge. Holding the doll upside down, you’ll work along the bottom edge of the doll’s body, which is now at the top of the work, from right to left.
dc 12 through 2 layers so you are sealing the body up.
Break yarn and pull through to finish.
Arms (make 2)
Magic circle 6 in skin tone
Work 9 rnds of dc.
No need to stuff
As with body, ch1 and turn, fold end of arm and work through 2 layers rather than in a round, dc 3 to seal. Break yarn and pull through to finish.
Legs (make 2)
Using accent colour, magic circle 8
rnd 1-2 dc 8
Change to skin tone
Rnd 3-11 dc 8
As with body, ch1 and turn, fold end of leg and work through 2 layers rather than in a round, dc 3 to seal. Break yarn and pull through to finish.
Wings
These are made up of two pair of different shaped wings sewn onto the body. See pictures for positioning.
Small Wings
Magic circle 8 in accent colour, sl st into 1st st to join and ch2.
rnd 1 *tr 2 in 1 st* 7times, tr 1, sl st to join.
Break yarn and pull through to finish.
Large wings
Begin the same as small wings, then:
rnd 2 *dc 2 in 1 st* 8 times, *tr 1, ch 1* twice, dtr, ch, *dtr and ch twice in 1 st* 2 times, dtr, tr 1, ch 1, tr1,
rnd 3 dc 4, *dc 2 in 1 st, dc 1* 4 times, dc 8, *tr, ch* twice, *dtr, ch* 3 times, *tr, ch* twice, dc 4, sl st to complete.
Break yarn and pull through to finish.
Pointy Pixie Ears (make 2)
Magic circle 6
dc 1, then tr 1 into the same st.
Break yarn and pull through to finish.
To make up
Sew limbs and wings to body and ears to head using photos for reference. Embroider eyes, eyelids and lips to head, and then sew beads in the middle of the irises.
Hair
Make 70-80 14cm (approx) lengths of your fancy yarn.
Insert your hook underneath the st where you want to place the strand of hair (see photo for reference), fold strand of hair in half and pull the middle through scalp slightly. Hook two bits of the strand and pull through the loop. This forms the knot.