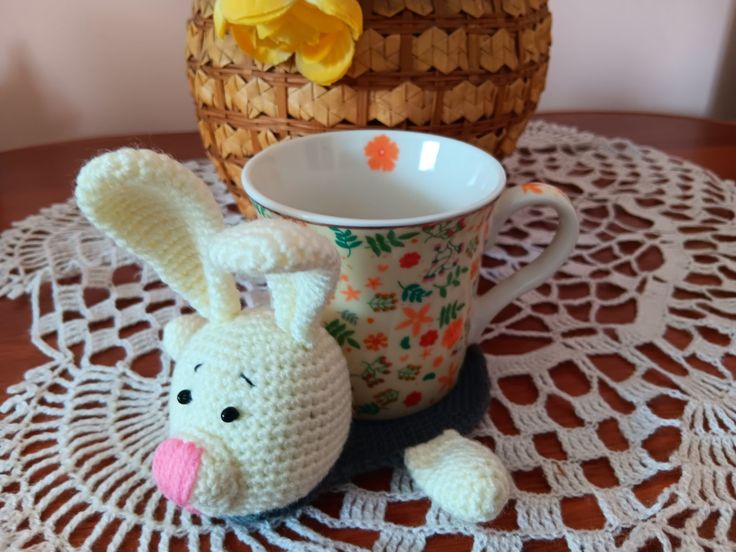
Crochet Bunny Coaster
The Crochet Bunny Coaster is an adorable addition to any home! This charming coaster not only protects your surfaces but also adds a touch of cuteness to your table decor. Its intricate design and soft texture make it perfect for a cozy afternoon tea or coffee break. Handmade with love, this Bunny Coaster is sure to bring a smile to your face every time you reach for your favorite drink. Spruce up your space with this delightful and practical accessory that will surely be a conversation starter among your guests!
SUPPLIES YOU NEED
ca 30 gr cotton yarn (e.g. Schachenmayr Catania 125m/50g) in three colors: grey, white and rosa or choose any colors you wish, crochet hook 2,5 mm, polyester fiberfill stuffing, scissors, 2 black beads or safety eyes, yarn needle.
I suggest using a cotton yarn. Cotton is easy to care for. It’s absorbent, so it’ll soak up your cold drink condensation and catch that moisture.
SKILL LEVEL
Intermediate
SIZE
The ready drink coaster is approx. 10,5 cm in diameter, can be made bigger or smaller depending on the yarn and hook you use.
SKILLS YOU NEED
chain, single crochet, double crochet, half double crochet, slip stitch, increase, decrease
ABBREVIATIONS
Ch =chain
St = stitch
Sc = single crochet
Sl st = slip stitch
dec = decrease stitch (two single crochets together)
inc = increase stitch (two single crochets in the one stitch)
Dc = double crochet
Rnd = Round
* = repeat instructions for the times indicated
(...) = total amount of stitches
TIPS
- Do not join rounds, work in a continuous spiral.
- Use a stitch marker or a piece of yarn to mark the end or the beginning of a round
- All stitches are worked into both loops, unless stated otherwise in the pattern.
- You can use any type of yarn if you have a corresponding crochet hook size (check yarn label for recommendations)
- Numbers at the end of each round in parentheses ( ) = total number of stitches for that round or row.
- Please note that I use US crochet terms.
- Amigurumi can be made in any desired colors.
Seamless way of changing color when working in the round
Pick up the new color at the end of the round: inset your hook into the stitch, yarn over the new color and pull through the stitch and the loop on your hook to complete the stitch.
To make a magic ring
- Loop the thread twice around your middle finger
- Put the hook under both loops, pull the yarn under the loops and hook the thread again
- Pull the thread through the new loop. The first crochet stitch is ready!
- Repeat the needed number of times.
- Pull the inner threads to tighten the ring.
SHIFT STITCH
Sometimes during a work of the spiral amigurumi, you need to keep the work symmetrically. As work tends to twist to the right you need to adjust the position of the marker periodically (beginning of the round).
Shift stitches an extra stitch you work at the end of a round to make your work look symmetrical. If you notice that marker moves right, you need to work one extra stitch in the end of the round and move marker for one stitch (now 2nd stitch of the round becomes first). This is shift stitch.
The shift stitch is not included in the round description. To check if it’s time to work shift stitch fold your work in half and check if marker still goes straight or use a yarn that marks a straight line.
You may think this is an increase, but it isn’t. This way you don’t increase or decrease the number of stitches. The stitches count remains the same.
INSTRUCTIONS
The cup coaster consists of several parts which you crochet separately and then you will sew them together.
COASTER
Work in grey yarn.
Round 1: 6 single crochets into Magic Ring.
Round 2: increase 6 times (12 stitches)
Round 3: *single crochet in next st, increase* (18 stitches)
Round 4: *single crochet in each of next 2 stitches, increase* (24 stitches)
Round 5: *single crochet in each of next 3 stitches, increase* (30 stitches)
Round 6: *single crochet in each of next 4 stitches, increase* (36 stitches)
Round 7: *single crochet in each of next 5 stitches, increase* (42 stitches)
Round 8: *sc in each of next 6 stitches, inc* (48 stitches)
Round 9: *sc in each of next 7 stitches, inc* (54 stitches)
Round 10: *sc in each of next 8 stitches, inc* (60 stitches)
Round 11: *sc in each of next 9 stitches, inc* (66 stitches)
Round 12: *sc in each of next 10 stitches, inc* (72 stitches)
Round 13: *sc in each of next 11 stitches, inc* (78 stitches)
Round 14: *sc in each of next 12 stitches, inc* (84 stitches)
Round 15: sc in each of next 84 stitches
Rounds 16-19: sc in each of next 14 stitches, chain 1 stitch, turn the work.
Round 20: dec, sc in each of next 10 stitches, dec, chain 1 stitch, turn the work.
Round 21: sc in each of next 12 stitches
Round 22: dec, sc in each of next 8 stitches, dec, chain 1 stitch, turn the work.
Round 23: sc in each of next 10 stitches
Round 24: dec, sc in each of next 6 stitches, dec, chain 1 stitch, turn the work.
The coaster is ready.
BUNNY
HEAD
Crochet with the color yarn you wish and begin with a magic ring.
Round 1: 6 single crochets into Magic Ring.
Round 2: increase 6 times (12 stitches)
Round 3: *single crochet in next st, increase* (18 stitches)
Round 4: *single crochet in each of next 2 stitches, increase* (24 stitches)
Round 5: *single crochet in each of next 3 stitches, increase* (30 stitches)
Round 6: *single crochet in each of next 4 stitches, increase* (36 stitches)
Round 7: sc in each of next 36 stitches
Round 8: *single crochet in each of next 5 stitches, increase* (42 stitches)
Rounds 9-16: sc in each of next 42 stitches
Round 17: *dec, sc in each of next 5 stitches* (36 stitches)
Round 18: sc in each of next 36 stitches
Round 19: *dec, sc in each of next 4 stitches* (30 stitches)
Round 20: *dec, sc in each of next 3 stitches* (24 stitches)
Stuff the head.
Round 21: *dec, sc in each of next 2 stitches* (18 stitches)
Round 22: *dec, sc in next st* (12 stitches)
Round 23: *dec* 6 times.
Fasten off leaving a long tail for sewing head to the coaster.
EAR (2x)
Crochet with any color yarn you choose and begin with a magic ring.
Round 1: 6 sc into Magic Ring.
Round 2: inc 6 times (12 stitches)
Round 3: *sc in next st, inc* (18 stitches)
Round 4-8: sc in each of next 18 stitches
Round 9: *dec, sc in each of next 4 stitches* (15 stitches)
Round 10-13: sc in each of next 15 stitches
Round 14: *dec, sc in each of next 3 stitches* (12 stitches)
Round 15-16: sc in each of next 12 stitches
Round 17: *dec, sc in each of next 2 stitches* (9 stitches)
Fasten off leaving a long tail for sewing. Work the second ear the same way.
ARM (2x)
Crochet with any color yarn you choose and begin with a magic ring.
Round 1: 6 sc into Magic Ring.
Round 2: inc 6 times (12 stitches)
Round 3: *sc in each of next 3 stitches, inc* (15 stitches)
Rounds 4-7: sc in each of next 15 stitches
Round 8: *dec, sc in each of next 3 stitches* (12 stitches)
Rounds 9-10: sc in each of next 12 stitches
Stuff slightly. Fasten off leaving a long tail for sewing. Work the second arm the same way.
MUZZLE
Crochet with white yarn or any color yarn you choose and begin with a magic ring.
Round 1: 6 sc into Magic Ring.
Round 2: inc 6 times (12 stitches)
Round 3: *sc in each of next 3 stitches, inc* (15 stitches)
Rnd 4: *sc in each of next 4 stitches, inc* (18 stitches)
Rnd 5: sc in each of next 18 stitches
Fasten off leaving a long tail for sewing. Stuff slightly.
TAIL
Crochet with white yarn or any color yarn you choose and begin with a magic ring.
Round 1: 6 sc into Magic Ring.
Round 2: inc 6 times (12 stitches)
Round 3: *sc in next st, inc* (18 stitches)
Rounds 4-6: sc in each of next 18 stitches
Round 7: *dec, sc in the next stitch* (12 stitches)
Round 8: sc in each of next 12 stitches
Round 9: *dec, sc in each of next 2 stitches* (9 stitches)
Fasten off leaving a long tail for sewing. Stuff slightly.
ASSEMBLY
Since all the elements of your bunny coaster are crocheted, it´s time to sew them together. Use a blunt sweing needle.
Ears are attached to the head now. Thread a needle on one of the yarn tails left from the ears, fold the bottom of the ear toward center and sew it to the other side. Place the ears in their right place on the head. Using the yarn left sew them to the head of your bunny. Be sure to step back and take a look to make sure they are even. Attach muzzle to the head.
Mark where you want the eyes to be placed with pins and sew them with the distance of 4-5 stitches to the head of your bunny.
Embroider nose with pink color yarn. Begin with the outline of the upside down triangle. Insert the needle through the top of the head and pull it through leaving a little bit of a tail. Then insert the needle 1-2 rows under the eyes and pull it through where you want your rabbit’s nose to be. Fill in the triangle, and finish the uneven lines. At the end pull the needle out the same hole it originally went into, so that both yarn tails are coming out of the same hole. Tie a knot with both yarn tails, as close to the surface of the head as possible. Hide the yarn tails inside the head.
Add a line to the nose using black color yarn. Embroider eyebrows with black color yarn. Embroider mouth if desired. Proceed to the smile if desired. You can also add eyelashes. Weave in all ends.
Sew tail and legs to the coaster.
Now attach head to the cup coaster. Ready!