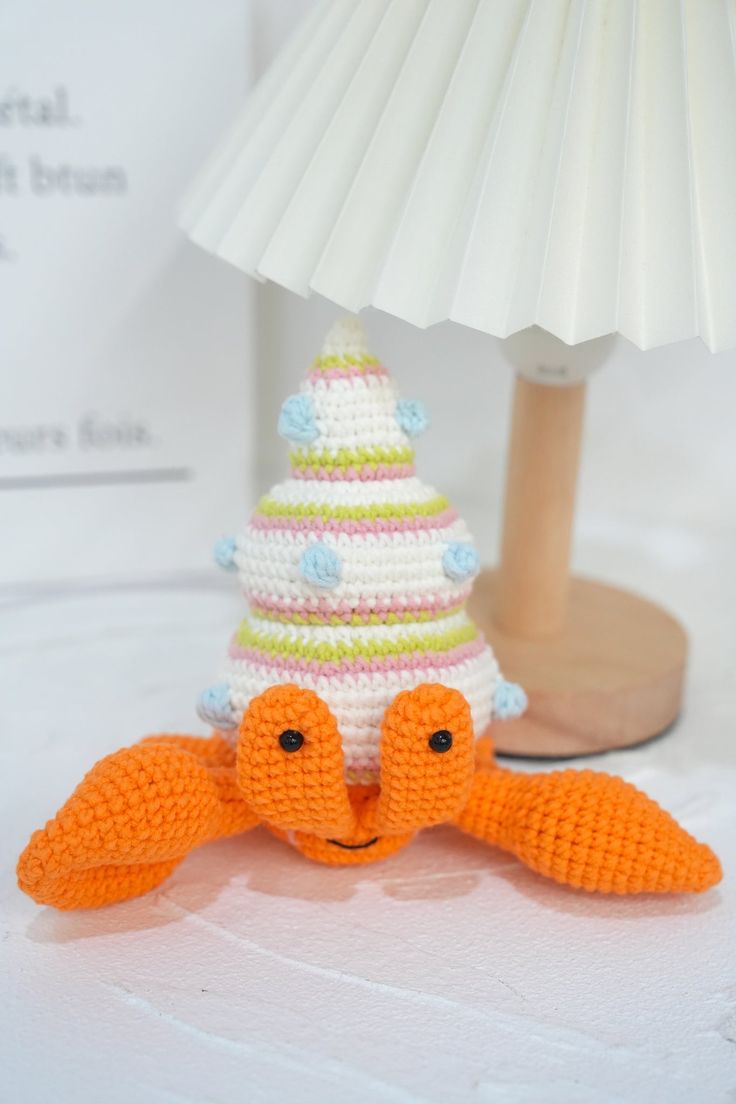
Crochet Hermit Crab
The crochet hermit crab is an adorable and creative way to bring a touch of the ocean into your home! These cute little crocheted critters make wonderful companions, whether perched on a shelf as a charming decoration or tucked into a child's toy collection. With their colorful yarn shells and tiny, detailed claws, they add a whimsical and cozy vibe to any space. Crafting your own crochet hermit crab can be a fun and rewarding project, perfect for both experienced crocheters and beginners looking to try something new. So go ahead and let these delightful creatures scuttle into your life and bring a smile to your face!
Materials Needed:
- Yarn– Loopara 5ply combed cotton (Green 03, Pink 17, Orange 34, Blue 38 and White 61)
- Hook- 2.8mm
- Fiber fill
- Yarn needle
- Stitch marker
- Eyeball
- Positioning pin
- Molding strips
- Scissors
- Tweezers
How to Crochet the Paw (Make 2)
- R1: Magic ring, ch 1, 6 sc in ring, sl.
- R2: Ch 1, 6 sc inc, sl.
- R3: Ch 1, 12 sc, sl.
- R4: Ch 1, (sc, sc inc) 6 times, sl.
- R5: Ch 1, 18 sc, sl.
- R6: Ch 1, (2 sc, sc inc) 6 times, sl.
- R7: Ch 1, 24 sc, sl.
- R8: Ch 1, (3 sc, sc inc) 6 times, sl.
- R9-13: Ch 1, 30 sc, sl.
- R14: Ch 1, (3 sc, sc2tog) 6 times, sl.
- R15: Ch 1, (2 sc, sc2tog) 6 times, sl.
- R16: Ch 1, (sc, sc2tog) 6 times, sl.
- R17-22: Ch 1, 12 sc, sl.
How to Crochet the Leg (Make 6)
- R1: Magic ring,ch 1, 7 sc, sl.
- R2-5: Ch 1, 7 sc, sl.
- R6: Ch 1, 3 sc in first st, 6 sc, sl.
- R7-10: Ch 1, 9 sc, sl.
How to Crochet the Eye (Make 2)
- R1: Magic ring, ch 1,6 sc, sl.
- R2: Ch 1, 6 sc inc, sl.
- R3-11: Ch 1, 12 sc, sl.
- R12: Ch 1, 3 sc inc, sc, 3 sc2tog, 2 sc, sl.
- R13-14: Ch 1, 12 sc, sl.
How to Crochet the Body
- R1: Magic ring, ch 1, 7 sc in ring, sl.
- R2: Ch 1, 7 sc inc, sl.
- R3: Ch 1, (sc, sc inc) 7 times, sl.
- R4: Ch 1, (2 sc, sc inc) 7 times, sl.
- R5: Ch 1, (3 sc, sc inc) 7 times, sl.
- R6: Ch 1, (4 sc, sc inc) 7 times, sl.
- R7-9: Ch 1, 42 sc, sl.
- R10: Ch 1, (4 sc, sc2tog) 7 times, sl.
- R11: Ch 1, (3 sc, sc2tog) 7 times, sl.
- R12: Ch 1, (2 sc, sc2tog) 7 times, sl.
- R13: Ch 1, (sc, sc2tog) 7 times, sl.
- R14: Stuff with fiber fill. Ch 1, 7 sc2tog, sl.
How to Crochet the Shell
- R1: (With orange) Magic ring, ch 1, 6 sc in ring, sl.
- R2: Ch 1, 6 sc, sl.
- R3: Ch 1, (sc, sc inc) 3 times, sl.
- R4: (With Green) Ch 1, (2 sc, sc inc) 3 times, sl.
- R5: Ch 1, (3 sc, sc inc) 3 times, sl.
- R6: (With white) Ch 1, (4 sc, sc inc) 3 times, sl.
- R7-8: Ch 1, 18 sc, sl.
- R9: Ch 1, (5 sc, sc inc) 3 times, sl.
- R10: Ch 1, 21 sc, sl.
- R11: (With green) Ch 1, (6 sc, sc inc) 3 times, sl.
- R12: (With pink) Ch 1, 24 sc, sl.
- R13: (With white) Ch 1, 24 sl st, sl.
- R14: Ch 1, working in slip stitches: (sc, sc inc) 12 times, sl.
- R15: Ch 1, 36 sc, sl.
- R16: (With green) Ch 1, (5 sc, sc inc) 6 times, sl.
- R17: (With pink) Ch 1, (6 sc, sc inc) 6 times, sl.
- R18-21: (With white) Ch 1, 48 sc, sl.
- R22: Ch 1, (6 sc, sc2tog) 6 times, sl.
- R23: (With green) Ch 1, (5 sc, sc2tog) 6 times, sl.
- R24: (With white) Ch 1, 36 sl st, sl.
- R25: Ch 1, (2 sc, sc inc) 12 times, sl.
- R26: (With green) Ch 1, (7 sc, sc inc) 6 times, sl.
- R27: (With pink) Ch 1, (8 sc, sc inc) 6 times, sl.
- R28-32: (With white) Ch 1, 60 sc, sl.
- R33: (With pink) Ch 1, (8 sc, sc2tog) 6 times, sl.
- R34: (With green) Ch 1, (7 sc, sc2tog) 6 times, sl.
- R35: (With white) Ch 1, (6 sc, sc2tog) 6 times, sl. Fasten off leaving long tail.
How to Crochet the Pom-poms
- Mark pom-pom positions with stitch markers.
- Work one single crochet in marked stitch.
- In the same stitch: Chain 2, work 3 double crochets together, chain 1, pull through all loops on the hook.
- Make a slip stitch in the corresponding stitch above.
- On the wrong side, weave in ends and secure with a knot.
- Repeat for all marked positions.
Crochet Hermit Crab Assembly
- Prepare orange yarn 41.5 grams and shell piece 24.5 grams.
- All crochet pieces should be completed before starting assembly.
- Stuff the shell with fiberfill, keeping it moderately filled.
- Add fiberfill to all leg pieces.
- Weave in all body ends and fasten off.
- Position the shell at an angle on the body, ensuring it covers the maximum area, secure it with stitch markers, and then sew it in place.
- When sewing the shell, maintain the angled position. You can secure additional points as needed, and then complete the remaining stitches.
- After sewing is complete, weave in ends and fasten off.
- Begin eye assembly by inserting wire supports, then locate the proper placement on body.
- Thread the needle and sew the eyes securely in place. Repeat for the second eye.
- Eye assembly is now complete.
- Add a small amount of fiberfill to the paws, take a separate length of orange yarn, fold the paw flat, and sew vertically from row 14 to row 1, creating claw indentations to form a paw shape.
- After sewing, fasten off, and add more fiberfill until firmly stuffed.
- Thread the needle and gather the opening, use positioning beads to secure it at the proper location on body.
- Sew paws in place, noting they should be attached at an angle.
- Complete sewing, repeat for the other paw.
- Secure legs with positioning beads, and attach to body, three on each side.
- Display the completed leg attachment.
- Attach safety eyes between rows 4-5.
- Using pink yarn, embroider blush marks between eyes and paws.
- Using single-strand black yarn, embroider the smiling mouth below eyes.
- After completing mouth embroidery, add a small amount of glue and adjust the shape with tweezers.
Crochet Tips:
1. Pull tight when joining rounds with slip stitches for cleaner shape definition and details.
2. Use crossed single crochet when possible, as it creates smaller holes than regular single crochet.
3. When changing colors, work the color change in the unfinished stitch of the previous round for smoother transitions and neater details.
4. For the shell's pom-poms, pay attention to insertion and final joining points. Work the pom-poms loosely for a fuller, more rounded appearance.
Assembly Tips:
1. When attaching the legs, ensure symmetrical placement on both sides for balance.
2. Sew the shell to the body at a slight angle to help the crab stand stably on flat surfaces.
3. When sewing pieces together, first secure a few stitches at wider intervals on both sides, then fill in the remaining spaces with additional stitches.
4. Leave extra length when wrapping wire with yarn for better stability and durability.