DIY Egg Carton Goldfish
If you're looking for a fun and creative DIY project, why not try making some adorable Egg Carton Goldfish? It's a simple and budget-friendly craft that is perfect for unleashing your artistic side. All you need is the simple stated materials and some imagination to create something special. With their bright colors and whimsical designs, these Egg Carton Goldfish will add a charming touch to any room and are sure to put a smile on your face. So go ahead and dive into this delightful craft project – your inner artist will thank you!
Supplies You’ll Need
Egg carton
Yellow Acrylic paint (or orange)
Yellow Tissue paper (in the same color as paint)
White pom poms (1cm-0.4″) x2
Black pom poms (5mm-0.2″) x2
Pink pipe cleaner 4″ long
Craft glue
Paintbrush
Scissors

How to Make DIY Egg Carton Goldfish
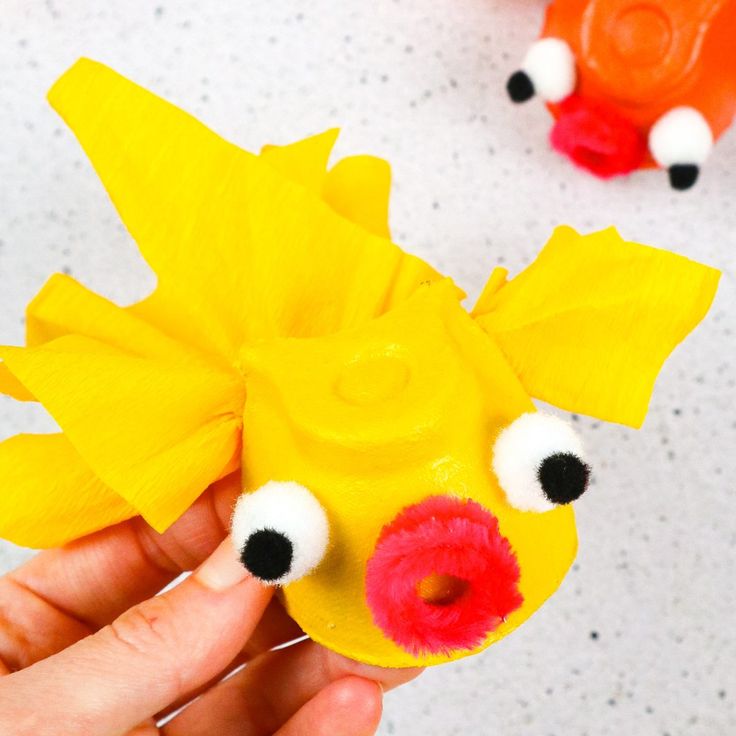
Step 1. The first thing you will need to do is create your goldfish’s body. Get your egg carton and cut out one of the corner cups.
Using your scissors, trim the egg cup so that it has a smooth and rounded edge. Ensure that it is trimmed evenly all around.
Step 2. It’s time to add some color! Paint your cup using either yellow or orange acrylic paint. Allow it to dry completely.
I recommend adding an additional layer. Let it dry before moving on.
Drying your goldfish may take a little bit of time but be patient. Your goldfish needs to be completely dry before you add anything else to it.
You can complete Step 3 and Step 4 while you are waiting for the paint to dry but be certain that your goldfish is dry before beginning Step 5.
Step 3. Cut three pieces of tissue paper into rectangles or squares. You will need two smaller pieces to form the fins and one longer piece for the tail.
Don’t worry too much about the exact sizes. Just make sure that two are smaller and one is larger.
Step 4. Fold each of your tissue paper pieces in half and then make a small twist in the middle of each one.
Now, you will scrunch and fluff the tissue paper a little bit so that it looks wavy and swirly like in the picture.
Step 5. Using your scissors, make a small slit at the back of your egg cup. This is where you will place your tail.
Step 6. Once the tail is secure, you can move onto the fins. Glue your fins onto either side of your fish.
Step 7. Let’s get started on that adorable goldfish face! Glue your white pom poms onto your fish first.
Then, take the smaller black ones to complete the eyes.
Step 8. Finally, get your pink pipe cleaner and wrap it around your finger twice. This should form a circle.
Your finished circle will be your fish’s mouth. Add glue to the back and place it onto your egg cup.
Doesn’t your fish look so cute? You are all finished creating your little goldfish!

No comments
Write a comment