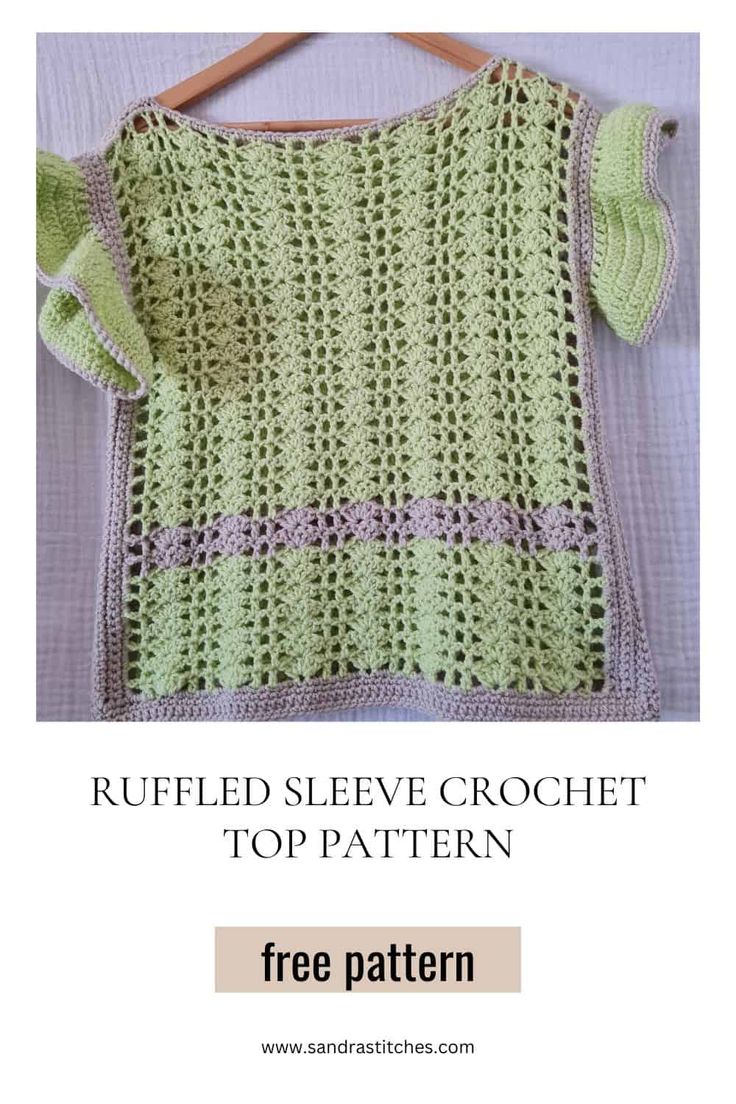
Crochet Ruffle Sleeve Top
The crochet ruffle sleeve top is a charming addition to any wardrobe. Its delicate crochet detailing adds a touch of elegance, while the ruffle sleeves give it a playful and feminine flair. This versatile piece is perfect for both casual outings and special occasions, making it a must-have for anyone who loves to add a bit of charm to their outfits. Go ahead and treat yourself to this adorable top - you'll be sure to turn heads and receive compliments wherever you go!
Difficulty
Project-Level-Easy
Materials
Weight-4-Medium
Bravo Burco Ipliksan 100%Acrylic, 100 gr, 3 skeins
YarnArt Finland 100% Acrylic, 100 gr ,0.5 skein
Choose any weight #4 yarn for this project it can be for winter using blended wool or summer using cotton yarn
Hook: US Size H-8(5 mm)
Yarn Needle, Scissors, Measuring Tape
Gauge
14 st X 6 rows of pattern repeat for 4” X4”
Sizes
Can be modified as you wish this sample is
Size M/L
length 21” 54cm, width 18” 46cm
Stitch Key
Ch = Chain
Sc = Single Crochet
St = Stitch
DC = Double Crochet
Yo = yarn over
Slst = Slip stitch
Specialty Stitches
Shell st [Skip 2 ch, dc 5 in next st, skip 2 ch, dc1, ch1, skip 1 ch, dc 1 in next st]
Notes
This Pattern is beginner-friendly, it uses only basic stitches, of course, you have to be familiar with single crochet, double crochet, and slip stitch.
I used 2 different yarns and colors you can decide which yarns and colors to use,
I recommend at least 2 colors for more interest in the pattern
This Top is made of two identical rectangles joined in shoulders and sides, and sleeves are added and worked in rounds
The Measurements are for these instructions- you can add or reduce chains to obtain your size
If changing colors make sure to have a changing technique
Instructions
Front and Back Panels ( make two identical)
Rectangle ( 7 Shell patterns)
Chain 62 ch (or multiple of 8+6)
R1: Dc1 in 6th ch from hook, Shell st *[skip 2 Ch ,Dc 5 in next st, skip 2 ch, dc1, ch1 ,skip 1 ch ,dc 1 in next st]* repeat from *to* all the way across the last st is a Dc
R2: Ch 4 turn your work (this counts as 1Dc+Ch1) skip 1 ch, Dc1 on top of Dc from prev row, *[skip2, Dc5 in next st from prev row(shell st), skip2 , Dc1 in next st, Ch1, skip1 , Dc1 in next st]* repeat from *to* across to end of the row
R3-28: Repeat R3 ( you can change colors or keep only one color, you can add rows to make it longer
R29: FINAL ROW PAY ATTENTION TO CHANGE HERE: Ch 4 turn your work (this counts as 1Dc+Ch1) skip 1 Ch, Dc1 on top of Dc from prev row, Ch1,skip2, Sc in 3rd Dc, skip2, Ch1,Dc1 in next st, skip1, Dc1 in next st, repeat all the way across
Continue to
Now we will make the detail on the sides of the Top.
Work the same on both sides
Turn your work on the right side up and from the bottom up on one side.
R1: SC across up to the shoulder part making 2 Sc in each Dc side for a total of 60 sc
R2-4: Ch1 turn your work, Sc in 1st st and in every st across to end of work
You Finished Rectangle #1- now make an identical second one
Construction
Measure 12 cm for the shoulder on each side leaving 28cm for the head and sew with a tapestry needle on both shoulders.
Measure 30 cm from the bottom up on both sides and sew with a tapestry needle to make the armhole.
Now to the sleeves
Turn your work right side up.
R1: Insert yarn in the join of the side part(under the arm) Ch3 and Dc1 in every st around, you do not have to count exactly the st but make sure you do not reduce because we want to make a curly sleeve Slst to ch3 from the beginning.
Do not turn work! Now we will increase to make the curly part- the ruffles
R2: Ch 3, Dc in same st, Dc2 in every st from prev row, Slst to ch3 from beginning
R3-4: Ch 3, Dc1 in every st all across Slst to ch3
R5: change color Ch1, Sc1 in every st from prev row to give the sleeve a neat ending.
Secure yarn, weave in ends, and cut yarn.
ruffle sleeve
Finishing
SC 4 rows around the bottom of the Top and SC 1 row around the neck. Secure yarn, weave in ends, and cut yarn.
Block your top before wearing it.
Enjoy!
No comments
Write a comment