If you're looking to add an extra special touch to your gifts, why not consider creating some DIY Fabergé eggs gift boxes? These charming little boxes are not only a unique way to package your presents but also a fun and creative project to work on. You can customize them with your favorite colors, designs, and embellishments to make each one truly one-of-a-kind. They will surely impress your friends and family and show them how much you care. So gather your crafting supplies, let your creativity flow, and get ready to make some unforgettable gifts with these delightful DIY Fabergé eggs gift boxes!
Difficulty – Medium
Materials For How to Make Faberge Eggs Gold Gift Box
- 3 inch oval paper mache box (paper mache boxes can be found at your local craft store)
- Gold metallic scrapbooking or craft paper
- 1/2 inch wide black and gold patterned ribbon
- 1/8 inch wide gold ribbon
- 10 flat gold beads
- 8 clear rhinestones
- 2 black rhinestones
- Scissors (for cutting paper and ribbon)
- Glue Stick (for attaching scrapbooking paper)
- Craft Glue (for gluing ribbon, rhinestones and beads)
How to Make Faberge Eggs Gold Gift Box
Cut a piece of the gold metallic craft paper measuring the entire length plus 1/4 inch and the exact height of the side of the oval box lid. Cut another piece of the gold metallic craft paper the entire length plus 1/4 inch and the exact height of the bottom side of the oval box.
Apply glue to the wrong side of the craft paper, especially around the edges. Attach the paper to the side of the box, lining up the top and bottom edge of the paper with the edges of the box and overlapping the edges on narrow part of the oval. Repeat this process with the bottom part of the box.

Use the lid of the box to trace the oval shape onto the wrong side of the gold craft paper. Cut out the shape. Trace the oval shape of the bottom part of the box onto the wrong side of the gold craft paper and cut out.
Apply glue to the wrong side of the craft paper oval traced from the lid. Attach the paper to the top of the box, lining up all of the edges. Repeat with the bottom part of the box.
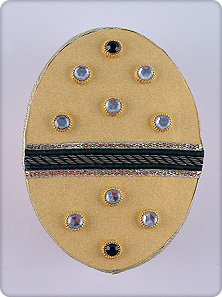
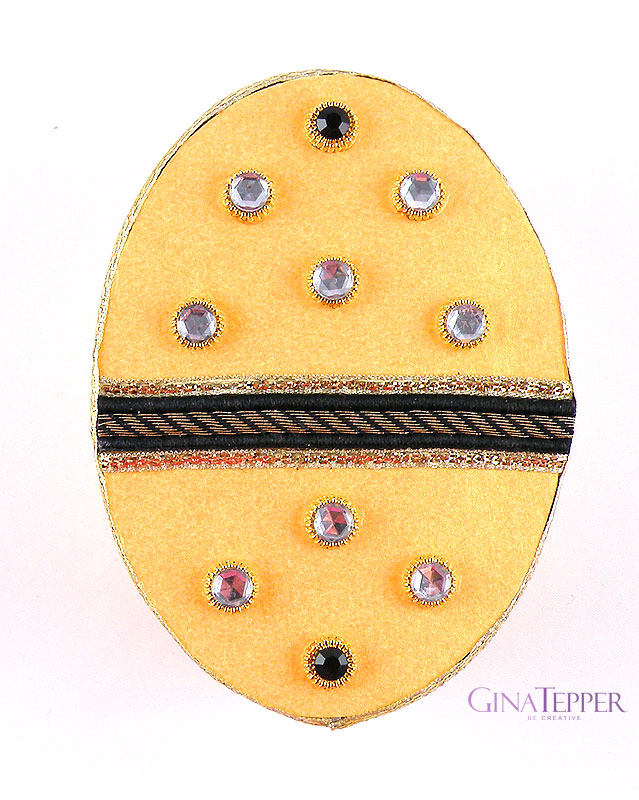
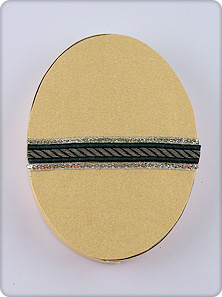
Cut one piece of the black ribbon and two pieces of the gold ribbon the entire width of the center top of the oval box lid.
Using craft glue, attach the piece of the black ribbon centered on the top of the oval box lid and glue the two pieces of gold ribbon on the top and bottom edge of the black ribbon. Small amounts of glue can be added to the cut edges of each side of the ribbon to prevent fraying.
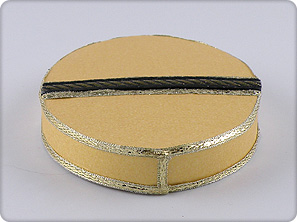
Cut two pieces of the gold ribbon long enough to wrap around the sides of the box lid.
Apply glue to the gold ribbon and attach it to the top and bottom sides of the box starting where the craft paper overlaps on the end of the box.
Cut a piece of gold ribbon the height of the box lid. Glue the ribbon over the seam where the craft paper and ribbon ends meet to make the seam invisible.
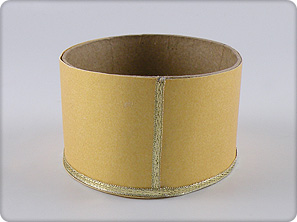
Cut one piece of the gold ribbon long enough to wrap around the sides of the bottom part of the box.
Apply glue to the gold ribbon and attach it to the bottom edge of the box starting where the craft paper overlaps on the end of the box.
Cut a piece of gold ribbon the height of the bottom of the box. Glue the ribbon over the seam where the craft paper and ribbon ends meet to make the seam invisible.
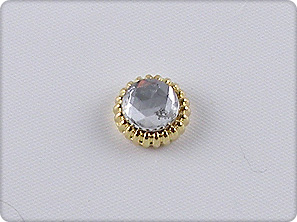
Using craft glue, attach one clear rhinestone on top of the hole of each of the gold beads. Repeat with the two black rhinestones. Let dry.
Using craft glue, attach the rhinestones to the top of the box lid in the configuration shown in the picture below.