Hey there! Creating a DIY recycled tin can planter made with old clothes scraps is such a fun and sustainable way to add a touch of creativity to your home! By upcycling materials like tin cans and old clothes, you're not only reducing waste but also giving new life to items that would have otherwise been thrown away. Plus, the end result is a unique and eco-friendly planter that you can proudly display in your home or garden. So grab those old clothes, get crafting, and enjoy watching your new planter bloom with personality and charm!

Tips:
Clean and sanitize the can: Ensure the tin can is thoroughly cleaned and sanitized before starting your project. Remove any labels, wash the can with warm soapy water, and let it dry completely.
Be cautious of sharp edges: The edges of tin cans can be sharp, so exercise caution when handling them. Sanding the edges lightly can help remove any sharpness.
Use non-toxic materials: When decorating your tin can, opt for non-toxic materials such as fabric, paint, or ribbon. This ensures the safety of both your plants and yourself.
Consider the size: Choose a tin can that is appropriate in size and depth, depending on the type of plant you wish to place in the pot. Ensure it provides enough space for the plant’s roots to grow.
1. Gather your materials:
- A clean and dry tin can
- Old clothes biases or fabric strips of different colors
- Scissors
- Hot Glue (fabric glue or a strong adhesive)
- Fabric Scissors
2. Prepare the tin can
Say farewell to those labels and stubborn adhesive residue on the tin can. Give it a good scrub with warm soapy water, ensuring every nook gets clean. Rinse it off and then leave it outside in the air until it’s completely dry.
3. Cut the fabric strips
Cut your old clothes biases/hems/finishes or make fabric strips into pieces that are long enough to wrap around the tin can. The width of the strips can vary according to your preference.
In my case, as I shyly admitted above, I used the bias tape edges of some old pairs of panties. And yes, of course, I washed them before making this craft.
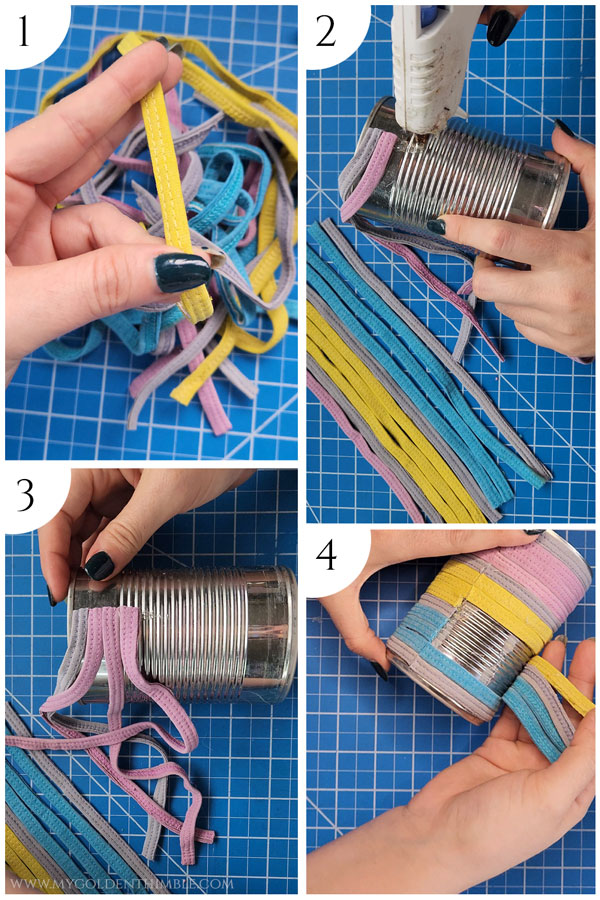
4. Apply glue to the tin can
Apply a thin layer of glue to a small section of the tin can, starting from the top or bottom.
I recommend you use hot glue. It makes a perfect adhesion between the fabric and the tin can.
5. Attach the fabric strip
Place one end of the fabric strip onto the glued section of the can and press it firmly to ensure it adheres properly.
Wrap the fabric strip around the tin can, applying more glue as needed until you reach the end of the strip.
Cut the excess (if any) of the strip with your fabric scissors so it can meet the other end.
6. Repeat the process
Repeat steps 4 and 5 with the remaining fabric strips, layering them one after another. You can alternate colors or create a pattern like I did here.
Don’t be afraid of being creative. You can add more embellishments like ribbon, paint, studs, or any other notion your heart desires!
7. Finish and let dry your Recycled Tin Can Planter
Once you have covered, the entire can with fabric strips, press them gently to ensure they are firmly attached.
If you use cold glue, allow it to dry completely before using your recycled tin can as a plant pot or for other decorative purposes.