Clothespin Christmas Soldiers
Clothespin Christmas Soldiers are a delightful and traditional way to bring some festive cheer into your home during the holiday season. These whimsical decorations crafted from wooden clothespins can add a touch of nostalgia and creativity to your Christmas decor. By painting the clothespins in festive colors, adding tiny details like buttons and googly eyes, and assembling them into little soldier figurines, you can create a charming display that will surely bring smiles to your family and guests. Whether you choose to place them on your mantel, hang them on your Christmas tree, or use them as table centerpieces, these Clothespin Christmas Soldiers will undoubtedly add a playful and heartwarming touch to your holiday celebrations. So, grab your paints and clothespins, unleash your inner artist, and get ready to spread some holiday cheer with these adorable handmade decorations!

Supplies
- Wooden Doll Pin Stands
- Wooden Doll Pins
- Toothpicks
- White craft glue
- Hot glue gun
- Medium black pom-poms
Americana acrylic paint:
- Cool White
- Antique Gold
- Ebony Black
- Flesh Tone
- Baby Pink
- Santa Red

First you’ll paint the head with flesh colored paint, then the top section with red. After that dries paint the white belt then insert the pins upside down in the stands so you can paint the “legs” black.
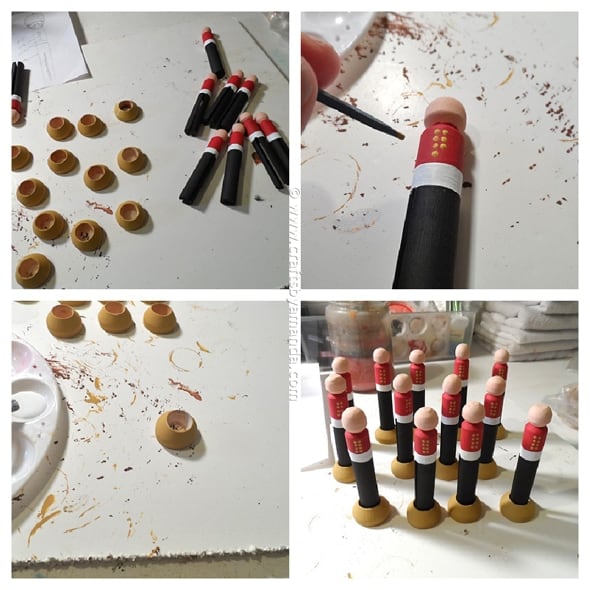
After they’ve dried, take them out of the stands and paint the stands gold. Use a toothpick to add gold buttons. Paint some glue inside the stands and put the doll pins back in.
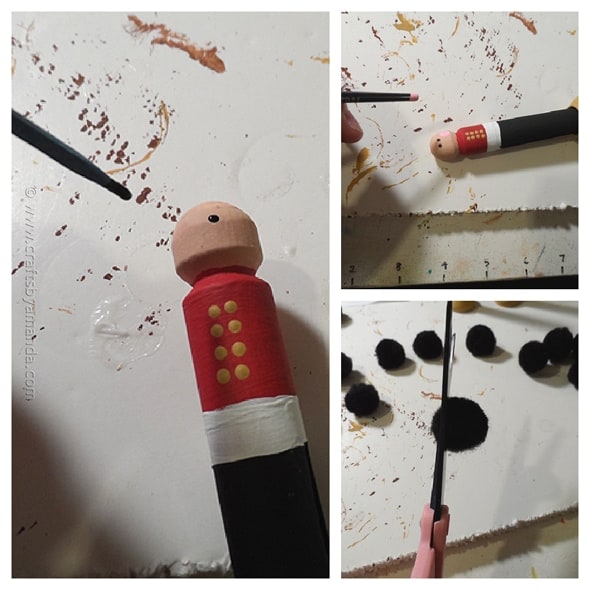
Use a toothpick to add the eyes with black paint, and the handle end of a paintbrush to add the cheeks with pink. Trim one side of a black pom-pom and attach it to the head.
Instructions
- Place each doll pin into a doll pin stand to make them easier to work with.
- Use a paintbrush to paint the head of the doll pin with Flesh Tone.
- Use a paintbrush to paint the top section of the doll pin, about 1/4" above where the pin splits, with Santa Red.
- Use a paintbrush to paint the belt on with Cool White, just below the red jacket and above the split.
- Turn the doll pins upside down so that the head is inserted into the doll pin stand. Use a paintbrush to paint the remaining doll pin (legs) below the belt with Ebony Black. Use a paintbrush to paint inside the split of the doll pins.
- When everything is dry, remove the doll pins from the stands. Use a paintbrush to paint the stands with Antique Gold.
- Use a toothpick dipped in Antique Gold to add eight buttons to the black jacket in four rows of two.
- Use any paintbrush to add white glue to the inside of the doll pin stands and insert the soldiers into the stands.
- Use a toothpick to dot on Ebony Black for eyes and the end of a paintbrush to add Baby Pink for the cheeks.
- Carefully trim one side of a black pom-pom to make one side flatter. Use hot glue to attach the flat end of the pom-pom to the top of the soldier’s head, adding a little hot glue to the sides as well so that you can press the sides of the hat in place.