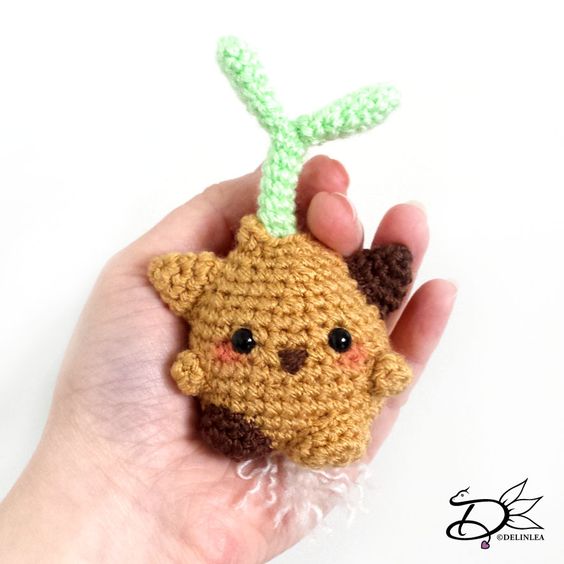
Crochet Amigurumi Cat Bulb
The Crochet Amigurumi Cat Bulb is a charming and creative take on traditional crochet projects. This adorable creation combines the cuteness of a cat with the whimsical touch of a lightbulb, making it a unique and delightful addition to any space. The intricate details of the crocheted design give this cat bulb character and personality, making it a wonderful gift for both cat lovers and fans of quirky decor. Whether displayed on a shelf or hung as a decoration, this crochet masterpiece is sure to brighten up any room and bring a smile to anyone's face. Crafted with love and attention to detail, the Crochet Amigurumi Cat Bulb is a playful and lovable companion that adds a touch of handmade charm to your home.

For this DIY you’ll need:
♥ Yarn in the colors; Light Brown, Brown, Green and Cream. (I used StyleCraft Special DK in the colors; Camel, Walnut, Spring Green and Cream)
♥ Crochet Hook (I used a 2,5mm hook).
♥ Stuffing.
♥ Scissors.
♥ Sewing Pins.
♥ Yarn Needle.
♥ Safety eyes, 5mm. (Optional
Stitches used (US Terms):
Magic Ring.
Ch = Chain.
SLST = Slip Stitch.
SC = Single Crochet.
HDC = Half Double Crochet.
ST = Stitch.
Inc = Increase.
Dec = Decrease.
(…) = Repeat the space in brackets the given number of times.
[…] = Total number of stitches.
Pattern
Leaves (Make 2)
Use the color Green
1: 6SC in Magic Ring. [6]
2: (1SC, inc) 3 times. [9]
3: 9SC. [9]
|
5: 9SC. [9]
6: (1SC, dec) 3 times. [6]
7: 6SC. [6]
Fasten off and leave a long tail for sewing.
Stem
Use the color Green.
1: 6SC in Magic Ring. [6]
2: 6SC. [6]
|
11: 6SC. [6]
Fasten off and weave in tail.
Bulb
Use the color Light Brown.
1: 6SC in Magic Ring. [6]
2: Inc in each st around. [12]
3: (1SC, inc) 6 times. [18]
4: (2SC, inc) 6 times. [24]
5: (3SC, inc) 6 times. [30]
6: (4SC, inc) 6 times. [36]
7: 36SC. [36]
|
10: 36SC. [36]
11: (4SC, dec) 6 times. [30]
12: 30SC. [30]
Between row 11 and 12 you will add the eyes, about 2,5cm apart. It’s also a good time to add the roots with cream to the bottom of the bulb, I attached 4 strands, and peeled those apart, so it looks a bit more like roots.
13: 30SC. [30]
14: (3SC, dec) 6 times. [24]
15: 24SC. [24]
16: (2SC, dec) 6 times. [18]
17: 18SC. [18]
18: (1SC, dec) 6 times. [12]
19: 1SC, 4HDC, 1SC, SLST. [7]
Fasten off and leave a long tail for sewing.
Arms (make 2)
Use the color Light Brown.
1: 6SC in Magic Ring. [6]
2: 6SC. [6]
Fasten off and leave a long tail for sewing.
Legs (make 2)
Use the colors Light Brown and Brown. (one each)
1: 6SC in Magic Ring. [6]
2: Inc in each st around. [12]
3: 12SC. [12]
Ears (make 2)
Use the colors Light Brown and Brown. (one each)
1: 4SC in Magic Ring. [4]
2: (1SC, inc) 2 times. [6]
3: (2SC, inc) 2 times. [8]
4: (3SC, inc) 2 times. [10]
Fasten off and leave a long tail for sewing.
Assembling
Sew the 2 leaves to the stem, at the point you started the stem.
With Sewing pins, it’s easier to see where you wanna place all the parts. With pinning them down to the place you wanna have the legs for example, you can see if it looks good. If not, you can easily replace them. What you can’t do easily when you already sew them on.
If you are happy with how your Cat Bulb looks, you can sew on all parts.
Lastly add the plant to the blub, insert it in the hole of the bulb and sew it on. I used the yarn tail from the blub, I thought this was easier, but do what feels good for you.
Don’t forget to make a nose, you can embroider it on or use felt. With some soft pastel I added some pink to the cheecks, maybe you wanna do that as well, just apply it with a brush.