Crochet Easy Handbag
Creating a Crochet Easy Handbag can be such a fun and rewarding project! Whether you're a beginner or a seasoned crocheter, this lovely accessory is perfect for adding a touch of handmade charm to your outfit. With just a few basic stitches and some colorful yarn, you can whip up a stylish and functional bag in no time. The best part is, you can customize it to match your style by choosing your favorite colors and adding fun embellishments like buttons or tassels. So grab your yarn and hook, put on your favorite show or podcast, and get ready to crochet your way to a fabulous new handbag that you can show off with pride!
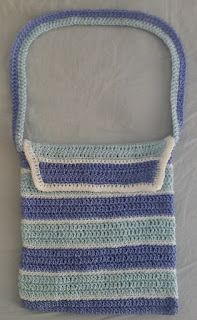
It's made from the bottom up, working in rounds then rows. The strap is added afterwards.
I made this using a thin yarn and a 3.5mm hook. But it can be made using any yarn that you like and the recommended hook.
The Body (in rounds).
Make the starting chain (in dark blue) as long as you would like the width of the bag. I made mine 22cm.
Rnd 1: Chain 3. dc into 3rd chain. dc all along the chain to the end. In the last chain place 3dc. Then dc all along the other side of the chain. Including into the other side of the 1st dc. Join to the top of chain 3. You should have 2 dc in each chain (one on either side), with 3 dc in each end.
Rnd 2: Chain 3. dc into each stitch. Join to top of chain 3 changing to white.
Rnd 3: Chain 1. sc into each stitch. Join to chain 1 changing to light blue.
Rnd 4: Chain 3. dc into the back loop of each stitch. Join to top of chain 3.
Rnd 5: Chain 3. dc into each stitch. Join to top of chain 3.
Repeat from Rnd 2 alternating between Light and Dark Blue. Stop (after a white rnd) once the bag is as tall as you like. I made mine with 7 blue stripes.
The Flap (in rows).
Row 1: Chain 3. dc into the back loop of half way around. turn.
Row 2 & 3: Chain 3. dc 2 together. dc until 3 before the end. dc 2 together. dc into top of chain 3. turn. (changing to white at end of row 3).
Row 4: Chain 1. sc into each stitch. sc into top of chain 3, changing to blue. turn.
Row 5: Repeat row 2, but stitch into the back loops only. turn.
Repeat from Row 2 alternating between Light and Dark Blue until the flap is the size you would like. Ending on a white row and NOT turning or changing colour.
Continue with sc down the side of the flap. Once you get to the body turn and work your way all around the flap to the other side (I place 3 sc in each corner). Turn once more and make your way back up the last edge and join at the corner. You should the up with 2 rows of 2 sc going around the edge of the flap.
Now is a good time to weave in all ends!
The Strap.
Using a larger hook (2 sizes up) and BOTH blues. Join to the top blue dc on 1 side. Make a chain as long as you would like the strap be. Mine is 76cm.
Join to the top blue dc on the opposite side. Make sure not to twist the chain.
*Using 1 blue and your original hook chain 3. Join last chain to next dc on the bag. dc into each chain. Join the last dc to the bag and weave in the end.
Repeat from * with the other blue.
Your bag is now ready to use. If you would like make it more practical, like me. You can always add lining and a zip.