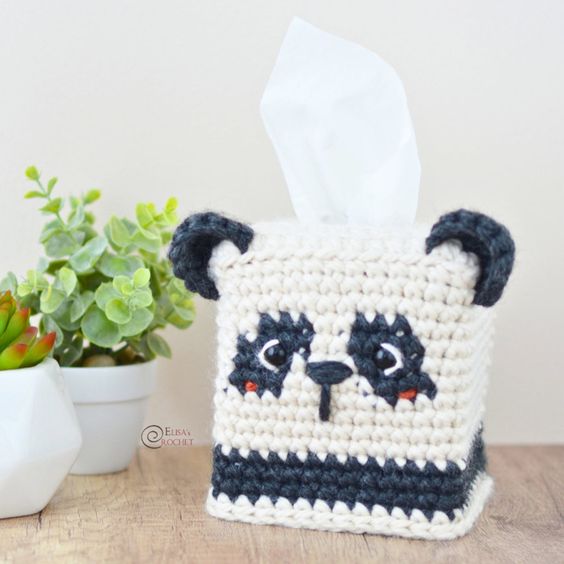
Crochet Panda Tissue Box Cover
The Panda Tissue Box Cover is an adorable and whimsical addition to any room, bringing a touch of fun and cuteness to your everyday essentials. With its soft and fluffy material that mimics a real panda bear, this cover not only disguises your tissue box but also adds a charming decorative element to your space. Its clever design allows you to easily refill the tissues while keeping them neatly hidden within the lovable panda exterior. Whether you place it in your living room, bedroom, or office, this tissue box cover is sure to bring a smile to your face every time you reach for a tissue. Make colds and sniffles a bit more bearable with this delightful and friendly panda companion by your side.
EASY
SIZE
About 6 in. (15 cm) tall.
MATERIALS
Lion Brand® Re-SPUN THICK & QUICK® (Art. #843)
#134Y Squash 1 ball (A)
#098AF Whipped Cream 1 ball (B)
#153J Raven 1 ball (C)
ADDITIONAL MATERIALS
Crochet hook size J/6 mm
Black Embroidery Floss
Embroidery Needle
GAUGE
10 sc + 12 rnds = about 4 in. (10 cm).
ABBREVIATIONS
ch = chain
rep = repeat
rnd(s) = round(s)
sc = single crochet
hdc = half double crochet
sl st = slip stitch
st(s) = stitch(es)
COVER
Top
With A.
Row 1: Ch 13, 1 sc in the 2nd ch from the hook, sc in the next 11 chs – 12 sc; Turn.
Rows 2 - 5: Ch 1, sc in each st along – 12 sc; Turn.
Row 6: Ch 1, hdc in next 3 sts, ch 6, skip 6 sts and hdc in next st, hdc in next 2 sts – 12 sts; Turn.
Row 7: Ch 1, sc in next 3 sts, 6 sc in ch-6 space, sc in next 3 sts – 12 sc; Turn.
Rows 8 - 11: Ch 1, sc in each st along – 12 sc; Turn.
From now on we’ll be working in round.
Rnd 12: Ch 1, sc in next 11 sts, 3 sc in next st, sc in next 9 sts, 3 sc in next st, sc in next 10 st, 3 sc in next st, sc in next 9 st, 2 sc in next st that already contains 1 sc – 50 sc.
Work in tapestry crochet, working over the top of the carried strand.
Sides
Rnd 13: Ch 1, working in back loop, sc in next 12 sts, sc2tog, sc in next 10 sts, sc2tog, sc in next 11 sts, sc2tog, sc in next 9 sts, sc2tog, – 46 sc.
Rnds 14 - 15: Ch 1, sc in each st around – 46 sc.
Rnd 16: With A, ch 1, sc in next 25 sts; with B, sc in next 3 sts; with A, sc in next 2 sts; with B sc in next 3 sts; with A, sc in next 13 sts – 46 sc.
Rnd 17: With A, ch 1, sc in next 24 sts; with B, sc in next 4 sts; with A, sc in next 2 sts; with B sc in next 4 sts; with A, sc in next 12 sts – 46 sc.
Rnd 18: With A, ch 1, sc in next 24 sts; with B, sc in next 3 sts; with A, sc in next 4 sts; with B sc in next 3 sts; with A, sc in next 12 sts – 46 sc.
Rnd 19: With A, ch 1, sc in next 24 sts; with B, sc in next 3 sts; with A, sc in next 5 sts; with B sc in next 3 sts; with A, sc in next 11 sts – 46 sc.
Rnds 20 - 23: With A, ch 1, sc in each st around – 46 sc.
Insert Eyes between Rnds 17 and 18, about 6 sts apart.
Rnd 24: With B, ch 1, sc in each st around – 46 sc.
Rnds 25 - 26: Ch 1, sc in each st around – 46 sc.
Rnd 27: With A, ch 1, sc in each st around – 46 sc.
Rnd 28: Sl st in each st around – 46 sl sts.
Fasten off and weave in ends.
With one strand of A, embroider curves along outer edges of safety eyes for white of eyes.
With B, embroider horizontal straight lines for Nose, between Rnds 18 and 19.
With B, embroider a vertical line below the Nose between Rnds 18 and 22.
With C, embroider 1 st long lines below Eyes for Cheeks between Rnds 19 and 20.
EARS (make two)
With B, make a magic ring.
Row 1: Work 6 sc in ring (close the ring but do not join 1st and last sts) – 6 sc; Turn.
Row 2: Ch 1, 2 sc in next st, sc in next 4 sts, 2 sc in next st – 8 sc; Turn
Row 3: Ch 1, sc in each st along – 8 sc.
Fasten off leaving a long tail for sewing Ears to upper corner of the Cover.