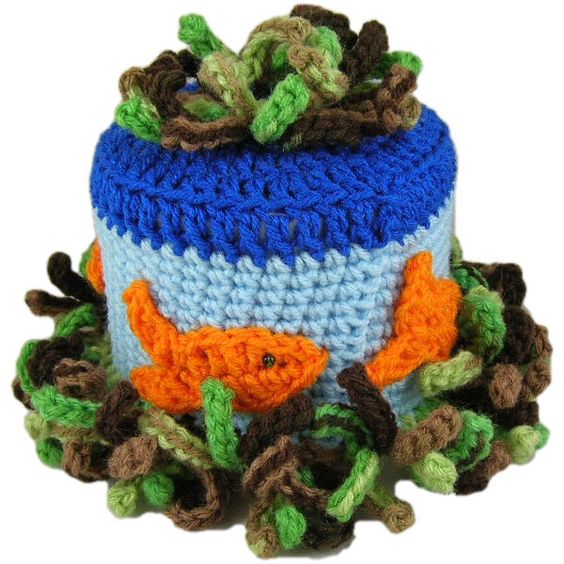
Crochet Little Fishies Bath Tissue Cover
Get ready to add a splash of fun to your bathroom decor with the Crochet Little Fishies Bath Tissue Cover! This charming accessory combines practicality with whimsy, making it a delightful addition to any toilet paper roll. Handcrafted with love and attention to detail, each little fishy brings a touch of playfulness to your bathroom. Not only does it keep your extra rolls neatly stored and easily accessible, but it also serves as a cute conversation starter for guests. So, why settle for a plain old tissue cover when you can have these adorable little fishies swimming around to brighten up your space? Dive into the world of cute and practical decor with the Crochet Little Fishies Bath Tissue Cover!

Materials Needed
Worsted weight acrylic yarn in royal blue
Worsted weight acrylic yarn in light blue
Worsted weight acrylic yarn in camouflage
Worsted weight acrylic yarn in pumpkin orange
4 Black E-Beads or other black beads 4mm in size
Black thread
Sewing needle
Size H/8 or 5mm aluminum crochet hook
Yarn needle for weaving in ends
Yarn Thickness: 4mm
Gauge: 4sc=1"
Finished Size: 7"w x 5.5" h
Skill Level: Intermediate
Instructions
With Royal Blue
RND 1: Ch4, join w/slst to first ch to form ring. Ch3, 11 dc in ring. Join w/slst to top of ch3. (12dc)
RND 2: Working in back loops only for this round. Ch3, dc in same st as slst. Dc in each dc around. Join w/slst to top of ch3. (24dc)
RND 3: Ch3, dc in same st as slst. Dc in next dc. *2dc in next dc. Dc in next dc. Rep from * around. Join w/slst to top of ch3. (36dc)
RND 4: Ch3, dc in same st as slst. Dc in each of the next 2 dc. *2dc in next dc. Dc in each of the next 2 dc. Rep from * around. Join w/slst to top of ch3. (48dc)
RND 5: Ch3, working in back lps only, Dc in each dc around. Join w/slst to top of ch3. Fasten off royal blue.
Join light blue in same st as slst.
RND 6-12: Ch1, sc in same st as slst. Sc in each dc around. Join w/slst to first sc. At the end of RND 12. Fasten off and weave ends into back of work.
RND 13: Join camouflage in same st as slst. Ch3, dc in each sc around. Join w/slst to top of ch3.
RND 14: Ch1, sc in same st as slst. Ch7, slst in 2nd ch from hook and in each of the next 5 chs. Sc in same st as last sc. Ch7, slst in 2nd ch from hook and in each of the next 5 chs. *Sc in next dc. Ch7, slst in 2nd ch from hook and in each of the next 5 chs. Sc in same st as last sc. Ch7, slst in 2nd ch from hook and in each of the next 5 chs. Rep from * around. Join w/slst to first sc. Fasten off and weave ends into back of work.
Top of Tissue Cover.
Join camouflage to front loop of RND 1 at top of tissue cover inserting hook from center side of loop to outeredge. Ch1, sc in same st as slst. Ch7, slst in 2nd ch from hook and in each of the next 5 chs. Sc in same st as last sc. Ch7, slst in 2nd ch from hook and in each of the next 5 chs. *Sc in next dc. Ch7, slst in 2nd ch from hook and in each of the next 5 chs. Sc in same st as last sc. Ch7, slst in 2nd ch from hook and in each of the next 5 chs. Rep from * around. Join w/slst to first sc. Fasten off and weave ends into back of work.
Little Fishies: Make 4 the same
W/Orange Ch8. Slst in 2nd ch from hook. Sc in next ch. Hdc in next ch. Dc in each of the next 2 chs. Hdc in next ch. Sc in next ch. Ch4, slst in 2nd ch from hook, sc in next ch, hdc & dc in next ch. Slst into first ch of ch8. Ch4, slst in 2nd ch from hook, sc in next ch, hdc & dc in next ch. Slst again in same ch of ch8. Ch1. Now you are working on the other side of the starting chain. Sc in next st. Hdc in next st. Dc in each of the next 2 sts. Hdc in next st. Sc in next st. Slst in last st. Fasten off leaving an 18" end for stitching to tissue cover. Weave the other end in.
Final Assembly
Step 1: Stitch black beads on each fish for eyes with sewing thread.
Step 2: Stitch each fish around tissue cover in the light blue area so all 4 fish are swimming in the same direction but they are placed on it randomly pointing up and pointing down. It does not need to be perfect. They are Fish after all!