Crochet Simple Messenger Bag
Looking to add a touch of handmade charm to your everyday style? The Crochet Simple Messenger Bag might just be the perfect accessory for you! With its versatile design and practical size, this bag is ideal for carrying your essentials while showing off your crochet skills. Whether you're heading to a casual outing or a quick shopping trip, this lovely bag is sure to catch some admiring glances. Its classic style and sturdy construction make it a timeless piece that you can enjoy for years to come. So why not grab your crochet hook and yarn and create your very own statement accessory that's both stylish and functional? Happy crocheting!
-I used a 4.00 mm hook
-stitch marker of any kind (I used a safety pin)
-two skeins of Schachenmayr SMC yarn in “Bravo” (pretty red!) color
Now, the two skeins were enough to make the body of the bag, but I had to buy an extra skein to make the shoulder strap, so make that three skeins.
What I did was start with a chain 95, sl st to first ch. (make sure the chain loop isn’t twisted or you won’t be able to work the bag right! Try to keep it all even.)
Round 1: sc in each ch around, sc on top of first sc in round. Mark sc with stitch marker, you will now be working in a spiral (95 sc) [if you feel more comfortable joining each round, you can do so, I just found this to be a bit more easier to handle for me]
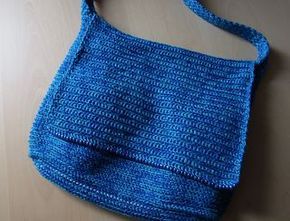
This made my bag around 11 inches wide, so if you want a larger one simply add more chains!
Round 2-43: continue to work sc in each sc around, making sure you have marked your first stitch just to keep things even.
The 43 rows made my bag (minus the flap) about 9 inches long.
Working the bag flap:
Round 44: sc in the next 46 stitches, turn, ch 1. (46 sc in total)
Round 45-83: continue to sc in the 46 stitches, turn, ch 1 for each row.
Finish off by cutting the yarn and weaving in the ends. Close the bottom of the bag by whip stitching or any other method you like to use.
Shoulder strap:
For this I decided to use two rings to attach the strap to each side of the bag. Again, you don’t have to do this, but if you want to follow along, I did this:
to connect the rings to the bag body, I just crocheted two little strips (ch 10, sc in each ch, turn, ch 1, sc for the next two rows) large enough to fit through the ring and reach the bag without it being too tight or small. After that I went ahead and attached both rings by using the strips I made.
Strap:
Round 1: making sure to leave a tail long enough for sewing the strap to the ring, ch 5, sc in second ch from hook, then sc in the next three stitches, turn, ch 1.
continue to work the 4 sc for a couple of rows (around 10 I would say) until it can fit through the ring and you can be able to attach it back to the strap.
I made my strap 8 stitches wide (2 and a half inches) so I did the increases like this:
Round 1: working from the 4sc strip, 2 sc in first stitch, 1 sc in next two st’s, 2 sc in last stitch, ch 1, turn.
Round 2: sc in each st, ch 1, turn. (6 sc total)
Round 3: 2 sc in first st, sc in next 4 sts, 2 sc in last st. (8 sc total)
Round 4: sc in each st, ch 1, turn.
From then on you just continue to sc until you reached the desired length of your strap. ( I did it 40” long.)
Once you are almost close to the length you want, start decreasing (to turn it back to 4 stitches so it can pass through the second ring).
decrease round 1: sc2tog, sc in next 4 sts, sc2tog, ch 1, turn.
Round 2: sc in each st, ch 1, turn. (6 sc total)
Round 3: sc2tog, sc in next 2 sts, sc2tog, ch 1, turn.
Round 4: sc in each st, ch 1, turn. (4 sc total)
Continue to crochet just like in the beginning making a strip.
Cut your yarn leaving a rather long tail to sew up the shoulder strap to the ring. Weave in everything and your done! Facil!
Next you just make the lining for the inside of the bag as well as the strap.
I added two large white buttons to the corners of the flap just for a bit more style.