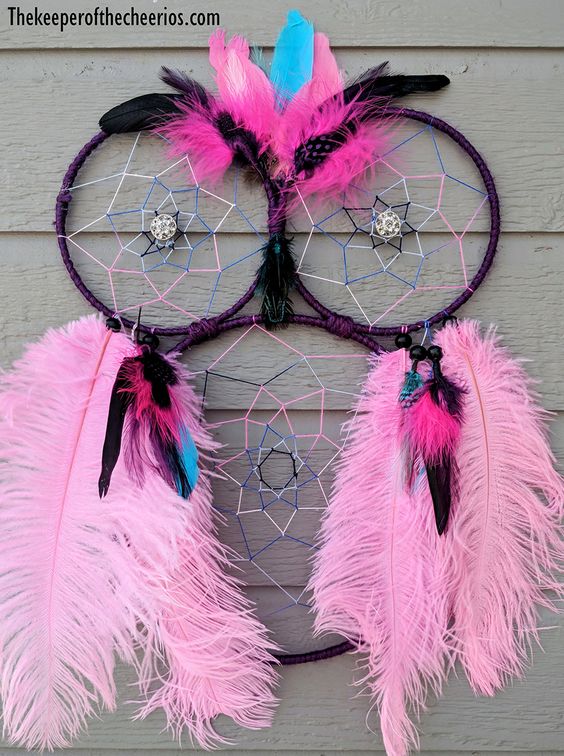
Owl Dream Catcher
The Owl Dream Catcher is a charming addition to any space, bringing a touch of whimsy and mystique. Encircled by delicate feathers and intricate beads, the wise owl at the center is said to protect your dreams and ward off negative energy as you slumber peacefully. Its earthy tones and intricate design make it a unique and captivating piece of art that not only adds a decorative touch to your room but also carries a deeper symbolic meaning of wisdom and protection. Hang it above your bed or in a cozy corner to infuse your space with a sense of tranquility and enchantment. Embrace the magic of the Owl Dream Catcher and let your dreams take flight under its watchful eyes.

Materials:
- Metal Hoops- 2 smaller sizes and 1–larger (size depends upon how large you want your owl and how much larger you want the eyes to be)
- Yarn (desired size and color)
- String, thread, embroidery floss or thin hemp
- Glue
- Gems (beads or gems large enough for the center of your eyes)
- Feathers (large plume feather and standard feathers in desired colors)
- Large holed beads (I used black wood beads)
Directions:
- Wrap your 3 hoops with your yarn or ribbon until they are completely covered (use glue to hold in place)
- Tie one end of your string/ embroidery floss around one of your metal hoop rings (that are covered in yarn or ribbon)
- Bring the string/ embroidery floss around through the inside of the hoop, over the top of the hoop, and back through the loop just made by the string/ embroidery floss. – see images
- Continue this motion all of the way around your hoop until you return back to the beginning.
- Continue to do the same thing again around the hoop, but instead of wrapping around the outside of the hoop, you will wrap around the middle of the loops.
- Continue to repeat this motion until you have reached the center of your dream catcher and tie off your thread. (use a dab of glue on your knot to hold in place)
- Do this with all 3 of your hoops
- Add a large bead or gem in the center of your 2 smaller hoops (you can do this before tying them off or in my case I glued them to the center attaching them to the string itself)
- Use more of your yarn or ribbon to tie your 3 hoops together (see images)
- Glue on some feathers to the top of your smaller hoops for eyebrows of your owl
- Glue a smaller feather or embellishment just below the 2 smaller hoops for a beak
- Use more of your string/ embroidery floss to tie onto the bottom halves of your smaller hoops
- Thread a large bead on each piece of string, add some glue to the base of your feather and poke into the bottom half of your bead
- Do this with your feathers until you have reached the desired amount (see images)
- Enjoy!
No comments
Write a comment